
If you’re scrolling through your social media feeds, you might have noticed a surge of creativity in gardening. The growing trend of vertical gardening has sparked a passion for unique and space-saving planter designs. That’s why I created this post. I want to share inspiring block planter ideas that allow you to maximize your gardening potential, even in the smallest of spaces.
If you’re a gardening enthusiast or a city dweller trying to make the most of your limited outdoor area, this guide is tailored for you. Whether you’re an experienced gardener or just starting out, the concepts here will help you bring more greenery into your life without needing a lot of room.
In this blog post, you’ll discover 14 innovative block planter concepts that stack easily without the need for mortar or glue. These ideas are not just practical; they’re fun and creative, allowing you to express your personality while enhancing your space. From DIY block planters to upcycled materials and easy planter designs, you’ll find something that inspires you to get your hands dirty and your garden growing.
Key Takeaways
– Discover 14 unique block planter ideas that are easy to stack and require no mortar or glue, making them perfect for small spaces.
– Learn how to utilize everyday materials like wooden crates, concrete blocks, and even recycled items for your vertical gardening projects.
– Find inspiration for creative DIY block planters that reflect your personal style and gardening preferences.
– Get practical tips for organizing your plants in a way that maximizes sunlight exposure and aesthetic appeal.
– Enhance your gardening skills by exploring innovative vertical gardening solutions that can transform your limited space into a lush, green retreat.
1. Stacked Stone Plant Towers
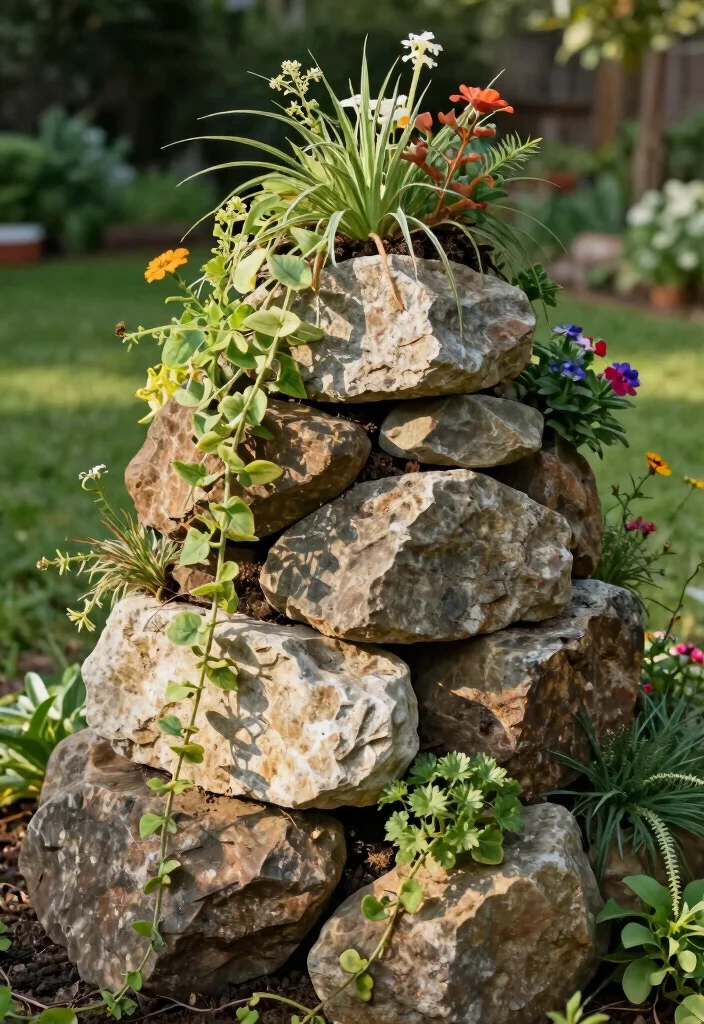
Want to add a rustic touch to your garden? Stacked stone plant towers are an eye-catching way to elevate your plants while enhancing the natural beauty of your space. Using large stones or concrete blocks, you can create a unique structure that not only supports your plants but also serves as a stunning focal point in your yard. Consider using natural river stones or repurposed bricks to make it eco-friendly and charming.
Begin by arranging larger stones at the base and gradually stacking smaller ones on top. Remember to leave gaps for proper drainage, and fill these with potting soil before planting your favorites. Trailing plants can add a beautiful drape over the edges, creating a lush visual effect.
Key steps to build your tower:
– Start with larger stones for stability
– Leave gaps for drainage and soil
– Choose trailing plants for added beauty
– Experiment with different stone types for texture
This design not only enhances your garden’s aesthetic but also offers a fun DIY project that helps you make the most of your space.
2. Wooden Crate Vertical Planters
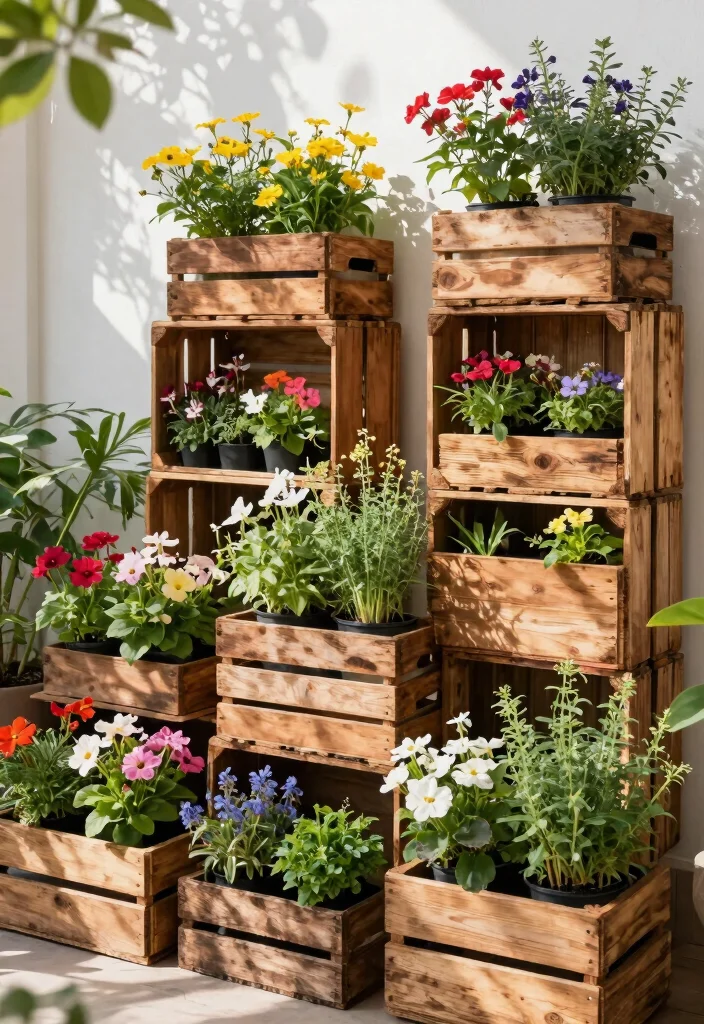
Looking to bring rustic charm to your vertical garden? Wooden crates are a versatile and stylish option that can help you maximize growing space. They can be stacked or mounted to create an attractive multi-tiered garden filled with your favorite plants. Sourcing old crates adds character and a sustainable touch to your garden design.
For best results, start by finding wooden crates at thrift shops or farms. Sand them down to eliminate splinters, then apply a weatherproof sealant for durability. Stack them securely and line the insides with gardening fabric to hold soil while allowing drainage.
Steps to create your planter:
– Source rustic wooden crates from local stores
– Sand and seal crates for longevity
– Stack securely and use gardening fabric
– Plant a mix of herbs and flowers for color
This approach not only maximizes vertical space but also adds a charming focal point to your garden, making it a favorite among gardening enthusiasts.
Thrift-store wooden crates turn tiny spaces into lush, movable gardens—stack them, mount them, swap in new plants with the seasons. Sand, seal, and reuse them year after year for rustic, sustainable block planter ideas you can actually pull off.
3. Tiered Planting Shelves
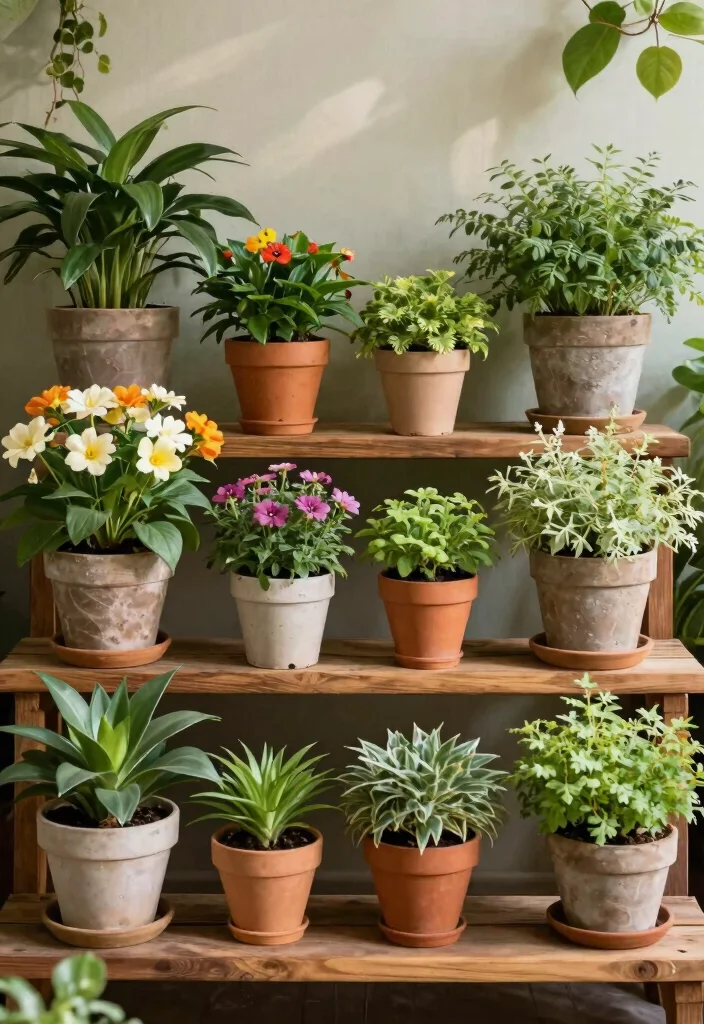
Want to make your plants the star of the show? Tiered planting shelves are a fantastic way to organize your pots while adding a striking visual element to your space. Crafted from wood or metal, these shelves can easily be built or purchased, offering a practical solution for maximizing vertical gardening.
Consider designing shelves with varying heights for added visual interest, and mix container sizes and colors for a vibrant look. Lightweight pots are ideal to prevent overloading the structure, allowing you to plant a range of trailing and upright plants.
Here’s how to create your tiered garden:
– Design shelves with varying heights for interest
– Mix container sizes and colors for vibrance
– Use lightweight pots for easy maintenance
– Plant a combination of trailing and upright plants
Tiered shelves not only create an organized display but also make caring for your plants easier, positioning them conveniently for watering and harvesting.
Did you know tiered planting shelves can add up to 60% more growing area in a tiny balcony? This block planter ideas approach stacks lightweight pots in varied heights, turning 4 square feet into a vertical-green oasis.
4. Upcycled Plastic Bottles

Ready to turn trash into treasure? Upcycled plastic bottles can be transformed into creative vertical planters, offering an eco-friendly solution for small spaces. These versatile planters can hang on walls or fences, adding a unique flair to any garden.
To start, cut the bottles in half and use the bottoms for planting. Make sure to punch drainage holes to prevent water accumulation, then attach them to pallets or directly to walls using hooks or nails. Fill with soil and small plants for easy access and a lovely display.
Steps for your bottle planters:
– Cut bottles in half and use the bottom half
– Punch drainage holes for proper water flow
– Mount on walls or pallets using hooks
– Fill with soil and plant easy-access herbs
This fun project reduces waste and creates a colorful display, perfect for eco-conscious gardeners looking to maximize their space.
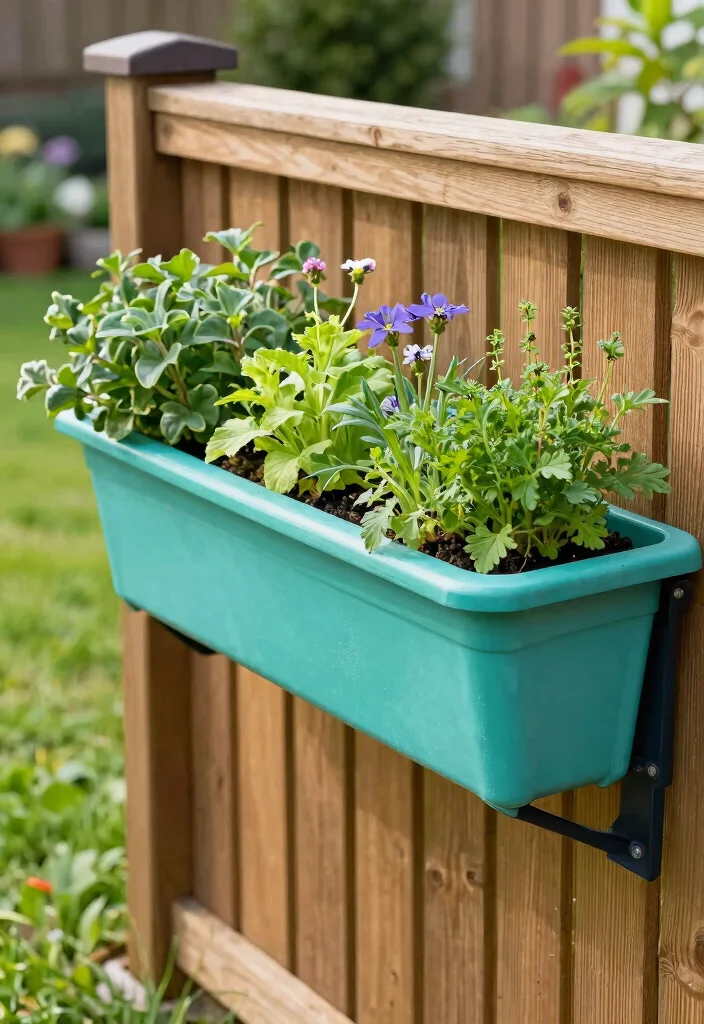
5. Pipe Planters
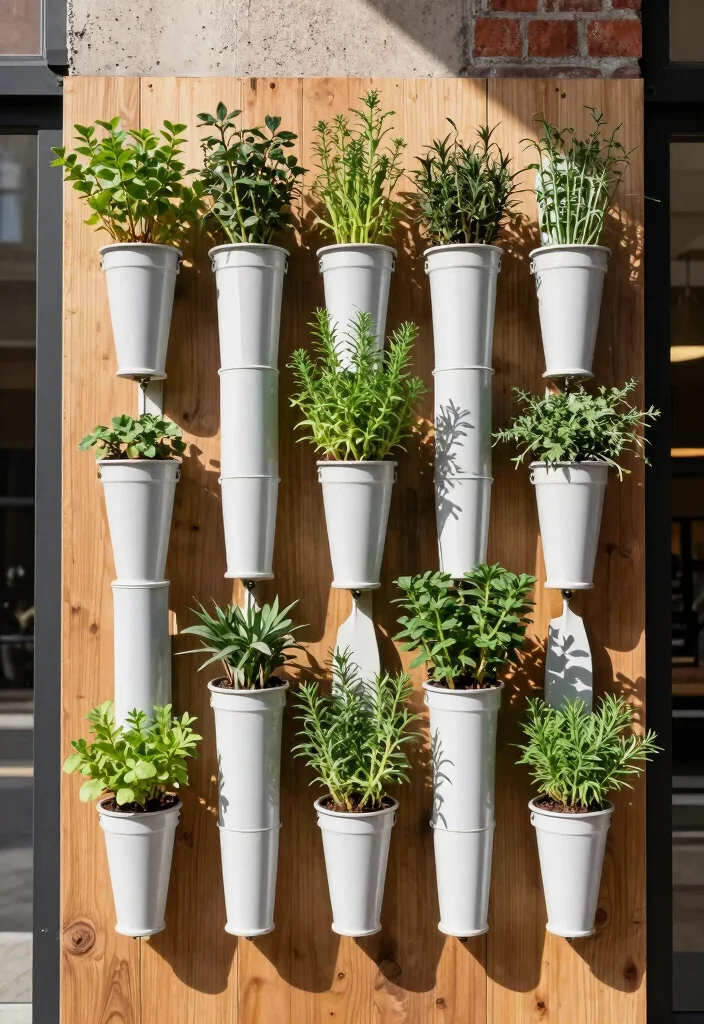
Want a sleek and modern gardening solution? PVC pipe planters offer an innovative way to grow plants vertically while making a stylish statement. Perfect for urban settings, these planters can be suspended or mounted on walls, saving space and looking great.
To create these planters, cut PVC pipes into sections and drill drainage holes in the bottom. You can also use end caps to create a water reservoir. Mount the pipes vertically on a wall for a striking design, and fill them with soil and compact plants like herbs or salad greens.
Steps for crafting your pipe planters:
– Cut pipes into sections and drill drainage holes
– Use end caps for a water reservoir
– Mount pipes vertically using brackets
– Fill with soil and plant compact plants
This design keeps your gardening neat and organized while providing a unique way to grow plants in limited spaces.
6. Hanging Basket Towers
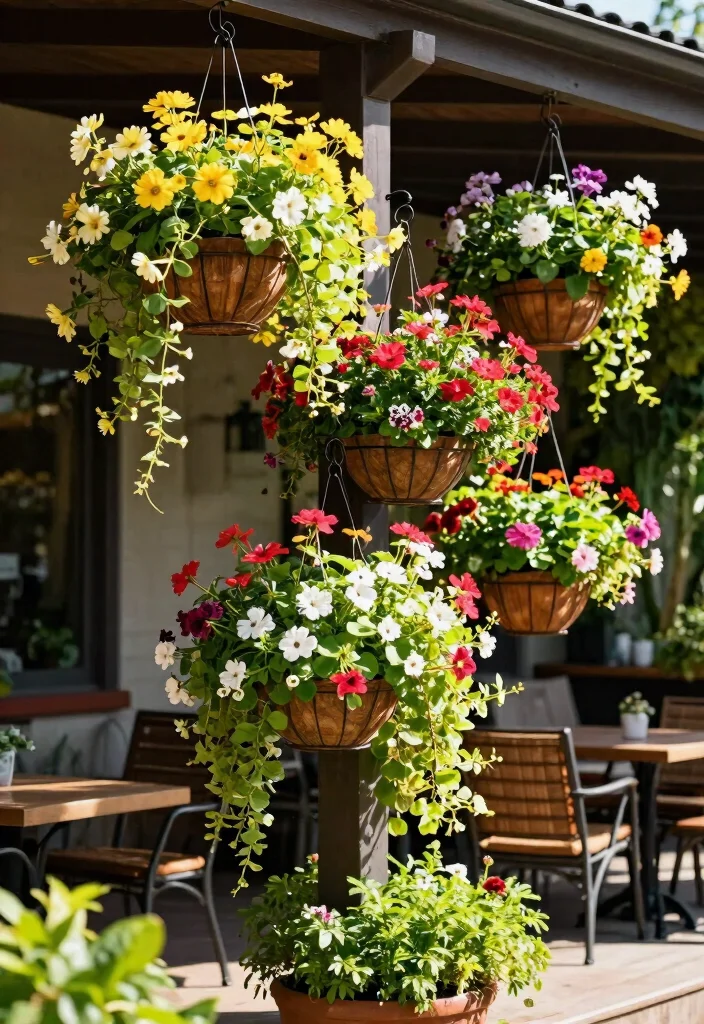
Looking to add depth to your garden? Hanging basket towers are a visually stunning way to create layers of color and texture. By stacking multiple hanging baskets at different heights, you can achieve a beautiful cascade of plants.
To get started, choose a sturdy structure to support your baskets, like a tree or metal frame. Mix basket sizes for a layered effect and fill them with seasonal blooms or trailing plants to create a vibrant display. Use potting soil mixed with organic fertilizers to ensure healthy growth.
Steps to create your hanging basket tower:
– Choose a sturdy support for your baskets
– Mix different basket sizes for layering
– Fill with seasonal blooms or trailing plants
– Hang near seating areas for enjoyment
This design not only enhances vertical space but also creates a lush environment that invites relaxation and enjoyment.
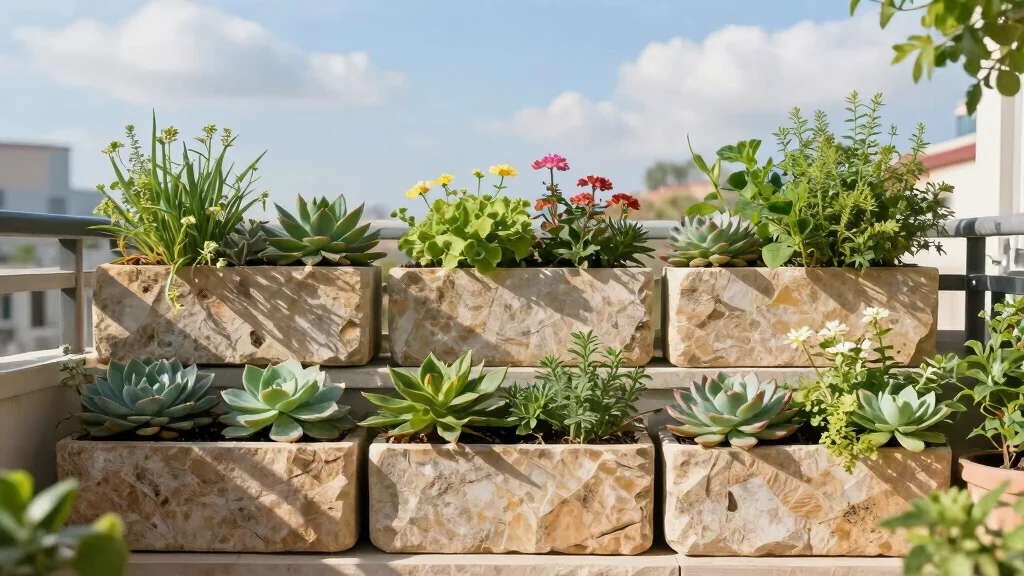
7. Concrete Block Planters
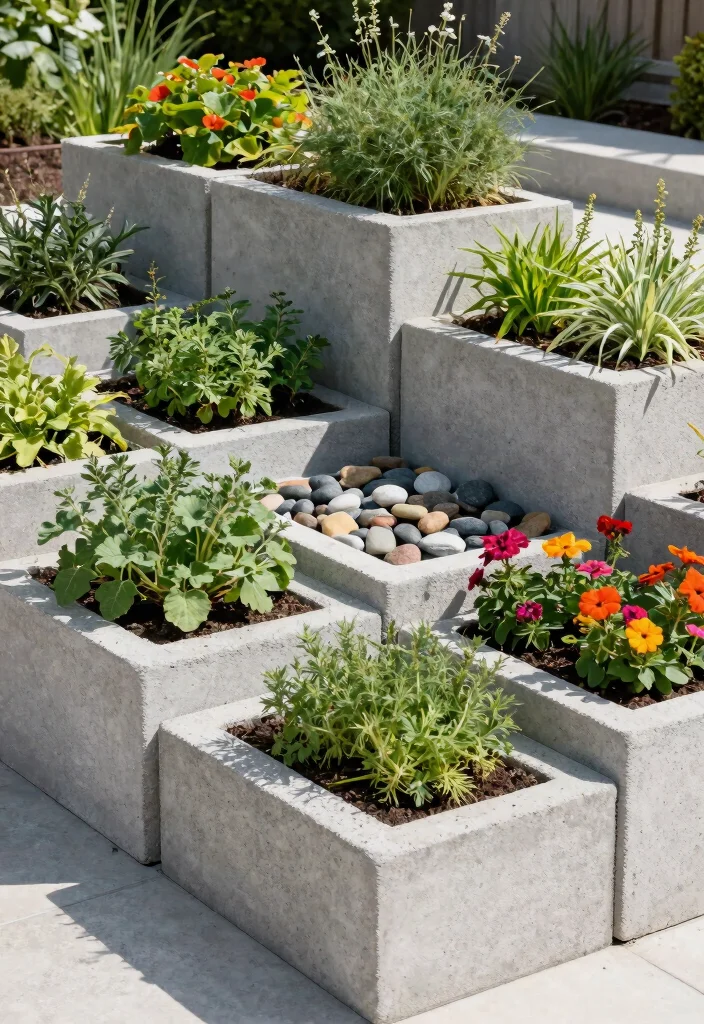
Searching for an industrial chic gardening option? Concrete blocks offer a sturdy, stylish solution for vertical gardening. These modular planters stack easily without needing adhesives, allowing for flexibility in design.
Start by stacking concrete blocks in a staggered pattern for an appealing arrangement. Fill each cavity with soil and choose plants that thrive together for a cohesive look. For added texture, consider using colorful stones or gravel to fill gaps, and make sure to place blocks on an elevated surface for proper drainage.
Key steps for your concrete block planters:
– Stack blocks in a staggered pattern
– Fill cavities with soil and compatible plants
– Use colorful stones for added texture
– Ensure blocks are elevated for drainage
This method not only offers a unique aesthetic but also allows for easy customization, making it a great choice for seasonal plant changes.
8. Reclaimed Wood Vertical Planters
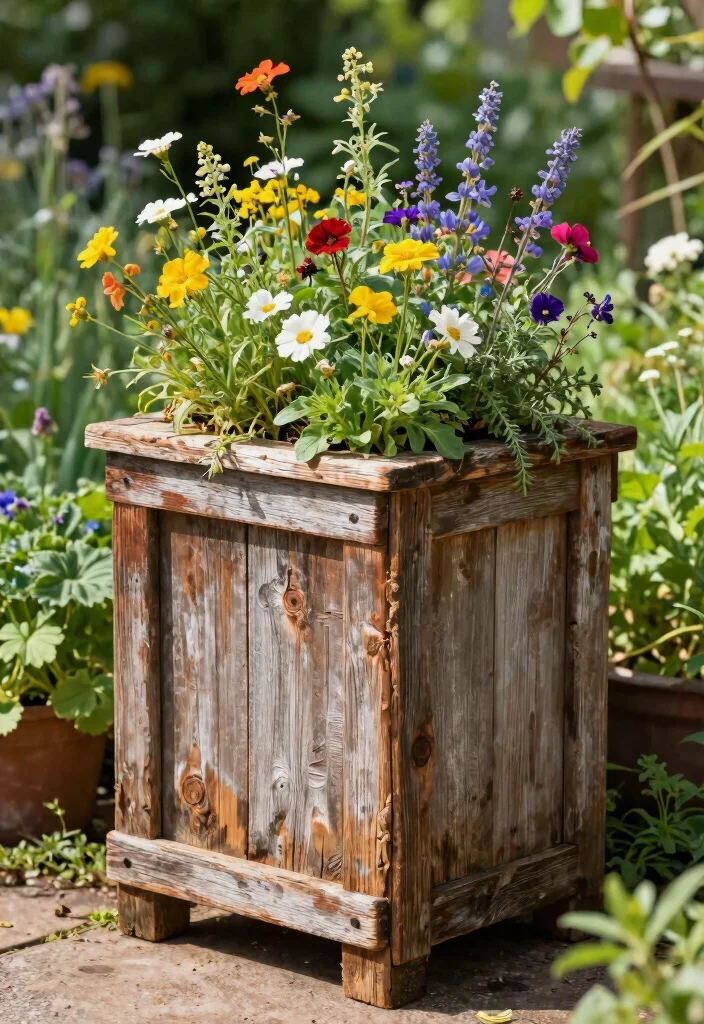
Are you passionate about sustainability? Using reclaimed wood for vertical planters can add a rustic touch while being eco-friendly. Each piece tells a story, making your garden not only beautiful but also meaningful.
Start by sourcing reclaimed wood from old furniture or pallets, ensuring it’s safe and free of chemicals. Cut the wood into sections to create boxes or tiers, then assemble them vertically for a stunning display. Fill with potting soil and a variety of plants for a lovely garden feature.
Steps to create your reclaimed wood planters:
– Source reclaimed wood for character
– Cut into sections for boxes or tiers
– Assemble vertically for a stunning display
– Fill with a variety of plants for beauty
This design showcases your commitment to sustainability while adding a personalized touch to your garden.
Difficulty Rating & Requirements
Overall Difficulty Rating: Medium
Creating block planters that stack easily without mortar or glue is a medium-difficulty project. It requires some basic crafting skills and an understanding of how to work with various materials. This project is suitable for hobbyists and DIY enthusiasts who enjoy gardening and want to add vertical elements to their outdoor spaces. Some designs may require patience and creativity, but many are approachable for those willing to learn.
Time Estimate:
⏱ Estimated time: 2-5 hours
– Planning & Design: 1 hour to choose your design and gather materials.
– Building the Planters: 1-3 hours, depending on the complexity of your chosen concept.
– Planting & Arrangement: 1 hour to plant and arrange your new vertical garden.
Skill Requirements:
– Required skills: Basic woodworking, cutting materials, and arranging plants.
– Beginner-friendly: Yes, many designs are simple enough for beginners to follow. Basic skills can be developed through practice.
– Skills that can be learned: You can learn to build simple structures and plant arrangements with tutorials. Crafting certain materials may require practice.
– Skills that may require experience: Working with power tools or intricate designs may need prior experience or supervision.
Tools & Materials Needed:
🧰 Essential items checklist:
– Wood or concrete blocks (required) – Base materials for constructing the planters.
– Drill or hammer (required) – For assembling your planter materials.
– Saw (optional) – If cutting wood or other materials is necessary.
– Soil (required) – To fill your planters for planting.
– Plants or seeds (required) – Choose plants suitable for vertical gardening.
– Rope or hooks (optional) – For hanging basket towers or fabric pocket planters.
– Paint or weatherproofing (optional) – To protect wooden materials from the elements.
– Level (optional) – To ensure your planters are even if stacking.
Step-by-Step Overview:
1. Planning & Design (1 hour): Research different block planter ideas and select one that fits your space. Gather materials and make a list of required tools.
2. Building the Planters (1-3 hours): Depending on your design, cut materials to size and assemble them. Follow the steps specific to your chosen concept, ensuring stability for stacking.
3. Planting & Arrangement (1 hour): Fill your planters with soil and arrange your plants. Consider sunlight, water needs, and aesthetics as you plant.
4. Finishing Touches (optional, 30 minutes): Add decorative elements or paint to your planters as desired, ensuring they are suited for outdoor use.
Professional vs DIY:
The cost for professional installations of similar vertical garden systems can vary widely, ranging from $500 to $2,000, depending on size and complexity. In contrast, creating your own block planters can cost between $50 and $200, depending on the materials and plants you choose. If you enjoy hands-on projects and have a creative flair, tackling this DIY could save you money and yield a unique garden feature tailored to your space.
9. Tiered Fruit Planters
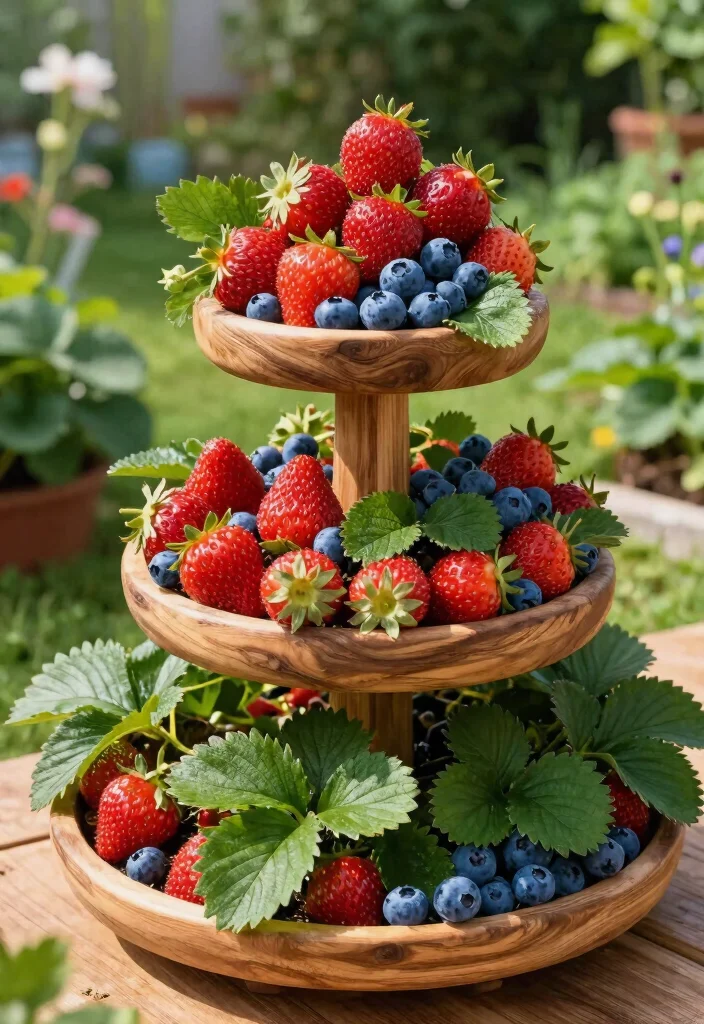
Ready to grow your own fruits? Tiered fruit planters are an excellent way to maximize vertical space while enjoying fresh produce right at home. Perfect for strawberries, blueberries, or dwarf fruit trees, these planters make gardening fun and rewarding.
Choose a tiered structure or stack containers to create your design. Ensure each tier is filled with the right soil type for the specific fruit, and consider companion planting with herbs to deter pests. A drip irrigation system can help maintain consistent moisture for optimal growth.
Steps to set up your tiered fruit planters:
– Choose a tiered structure for your fruits
– Fill each tier with the appropriate soil
– Consider companion planting for pest control
– Position in a sunny spot for growth
This approach not only maximizes growing area but also provides fresh fruits just steps away from your door, enhancing your gardening experience.
10. Fabric Pocket Planters
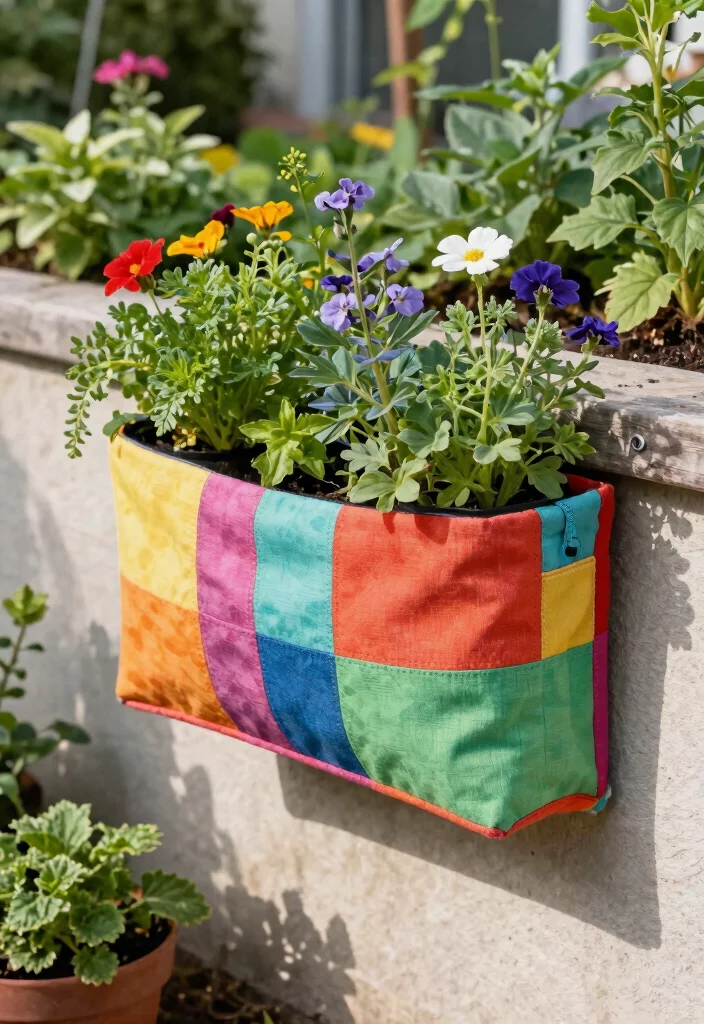
Looking for a trendy way to create a vertical garden? Fabric pocket planters are functional and stylish, offering multiple pockets for planting your favorite herbs and flowers. They’re perfect for adding color and texture to any wall or space.
To start, find or sew a fabric pocket planter that matches your style. Secure it to a wall or fence using hooks or nails, and fill each pocket with soil and plants that thrive together, such as herbs or small flowers. Water carefully to ensure that each pocket receives enough moisture for healthy growth.
Steps to incorporate fabric pocket planters:
– Find or sew a fabric pocket planter
– Secure to a wall or fence with hooks
– Fill pockets with suitable plants and soil
– Hang near dining areas for easy access
This design is perfect for limited spaces, providing a vibrant addition to your home while making gardening accessible and fun.
11. Recycled Tire Planters
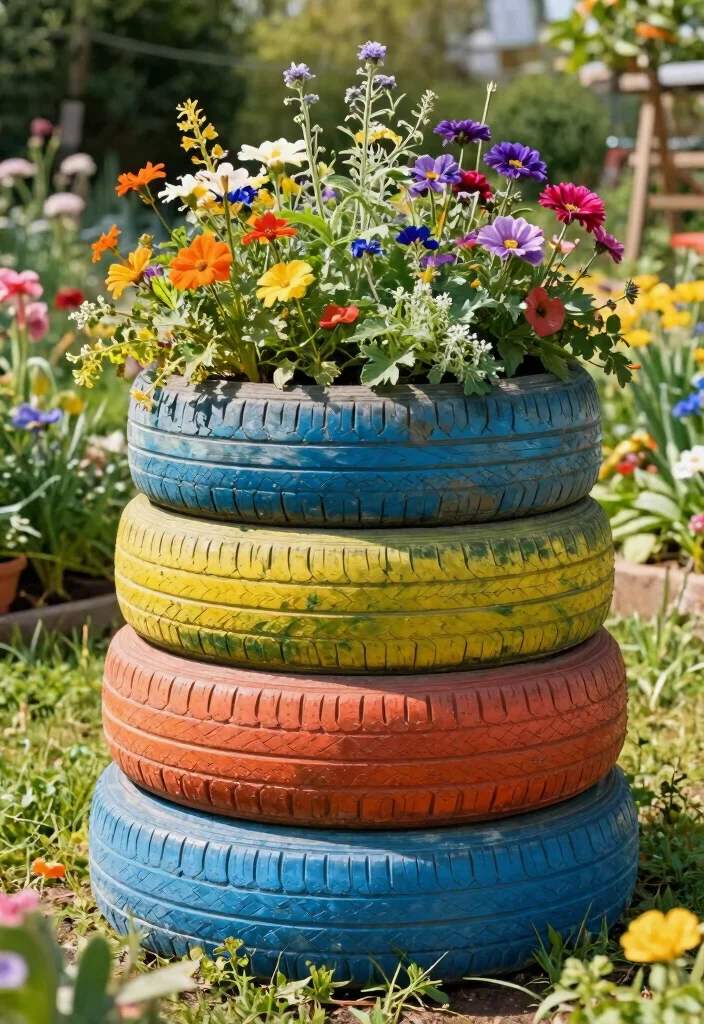
Want to add a quirky twist to your garden? Recycled tires can be transformed into creative vertical planters that stand out in any landscape. This fun and sustainable method allows for layering and unique shapes, offering a playful gardening experience.
Start by selecting clean, intact tires in various sizes to create an interesting look. Stack them to form a sturdy base and fill with soil and colorful plants. Painting the tires with non-toxic outdoor paint can add flair, while drilling holes in the bottom tire ensures proper drainage.
Steps to create your tire planters:
– Choose various sizes of clean tires
– Stack them for a sturdy base
– Fill with soil and colorful flowers
– Paint for added flair and style
This approach not only recycles materials but also introduces a playful element to your garden, making it a unique conversation starter.
12. Vertical Wall Garden Kits
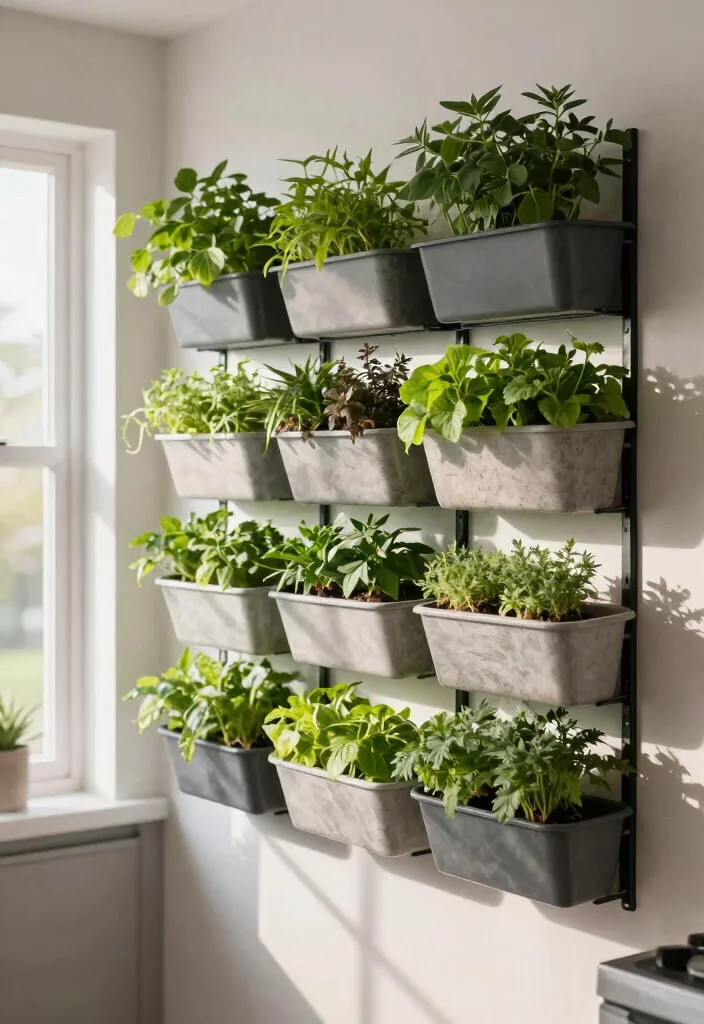
Are you a beginner looking to dive into vertical gardening? Wall garden kits are perfect for creating vibrant gardens without needing extensive experience. These kits come with everything you need, from planters to mounting hardware, making setup a breeze.
When selecting a kit, look for one that includes self-watering systems to simplify maintenance. Choose plants that suit your climate and light conditions, and follow the assembly instructions for an easy setup. Regularly check water levels and drainage to keep your plants thriving.
Key points for using wall garden kits:
– Choose kits with self-watering features
– Select plants suitable for your environment
– Follow assembly instructions for easy setup
– Regularly check water levels for healthy plants
These kits not only enhance your living space with greenery but also make gardening accessible and enjoyable for everyone.
Block planter ideas come alive with vertical wall garden kits—simple setup, self-watering, and instant style. Start with plants that fit your light and climate, and watch your small space bloom without heavy tools or mortar.
13. Pallet Planters
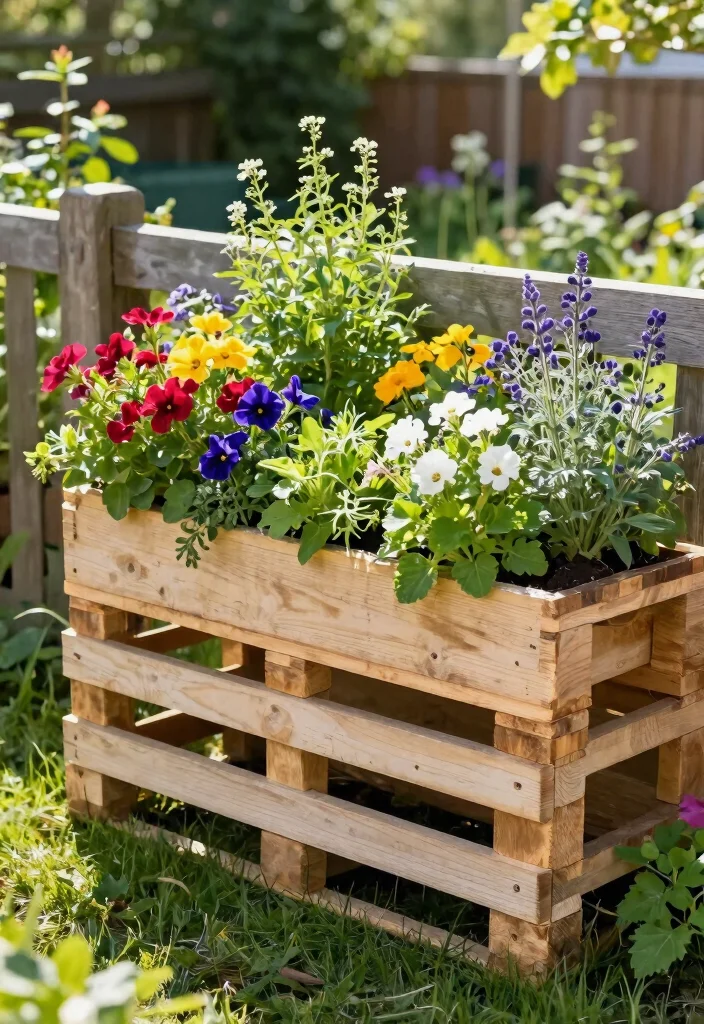
Want a simple and effective way to create vertical gardens? Wooden pallets are an excellent resource that allows for easy customization to fit your style and space needs. They can be transformed into beautiful planters with minimal effort.
To start, lay a pallet flat and fill it with soil for a raised bed, or prop it up vertically to fill the slats with plants. Choose a variety of flowering plants or herbs to fill the spaces, and secure the pallet to ensure stability, especially in windy conditions.
Steps to create your pallet planters:
– Lay flat for a raised bed or prop vertically
– Fill the slats with soil and plants
– Choose a variety of plants for beauty
– Secure the pallet for stability in wind
Pallet planters are not only practical but also allow for creative expression, making them a favorite among DIY gardening enthusiasts.
14. Gutter Garden Planters
Looking for a unique gardening solution? Old gutters can be repurposed into functional vertical planters, adding a modern touch to your space. This clever reuse of materials not only saves space but also enhances your garden’s aesthetic.
To create your gutter garden, cut the gutters into sections based on your desired length and drill drainage holes to prevent water buildup. Secure them horizontally on a fence or wall using brackets and fill them with potting soil and plants like herbs or flowers. Position them at a height that makes harvesting easy.
Steps to set up your gutter garden:
– Cut gutters into desired lengths for planting
– Drill drainage holes to prevent water accumulation
– Secure horizontally on a wall or fence
– Fill with soil and plant easy-access herbs
This design is perfect for those who appreciate a modern look while maximizing limited space, creating a visually appealing garden feature.
Conclusion

Vertical gardening offers an innovative solution for those looking to cultivate lush spaces without taking up too much room.
From upcycled materials to modern designs, these 14 block planter concepts provide practical, beautiful ways to enjoy gardening.
Whichever style resonates with you, incorporating vertical planters into your home can transform your space into a botanical oasis.
Frequently Asked Questions
What are block planter ideas and why are they perfect for stacking in small spaces?
Block planter ideas let you build a scalable vertical garden using hollow concrete blocks. They stack securely without mortar or glue, so you can change the height and shape as your space changes. This makes them ideal for balconies, narrow patios, or any small space where horizontal space is limited.
Tips to get started: pick hollow blocks designed for outdoor use, plan a layout that fits your space, and line each hollow cavity with landscape fabric or a thin plastic liner to hold soil and drainage. Then fill with a light potting mix and plant your chosen block planter ideas into place. You can cap the top with a row of blocks or a simple plank shelf to create a neat, weatherproof look. This approach aligns with vertical gardening solutions and easy planter designs, while offering a fun creative gardening projects vibe.
How can I build DIY block planters that stack without mortar or glue?
To build DIY block planters that stack without mortar or glue: start with a concrete-friendly layout and dry-fit the blocks before you commit. Then line the hollow interiors with landscape fabric or a sturdy plastic liner to hold soil and keep moisture in. Add a lightweight soil mix, plant, and stack additional blocks, dry-fitting each level. Because you’re not using mortar, keep the base on a flat, stable surface and consider placing a waterproof tray or outdoor mat underneath to catch overflow. This is a classic example of DIY block planters and block planter ideas that can grow with your space.
Tip: drill or widen drainage holes in the bottom row if needed, and limit height to what your space and blocks can safely support.
Which plants work best in vertical block planter concepts, and how many can I fit?
Plants for vertical block planter concepts work best when you choose shallow-rooted or compact varieties. Think herbs like basil, thyme, and parsley; greens such as lettuce and spinach; compact vegetables like radishes; and trailing flowers for color. In a typical block stack, plan for 1–2 plants per block in shallow cavities and up to 3–4 in deeper blocks if you’ve allowed for more soil depth. Remember to use well-draining potting mix and stagger rotations so you don’t overload any one row. This ties into vertical gardening solutions and easy planter designs to maximize yield and color in small spaces.
What are the best practices for maintaining and watering vertical block planters to prevent leaks and root rot?
Maintenance and watering tips for vertical block planters: ensure good drainage by using liners and with drainage holes; water in the morning so leaves have time to dry and to reduce disease; check moisture in each level regularly, aiming for evenly moist soil; use a lightweight, well-draining potting mix, and avoid waterlogged soil to prevent root rot. Consider a drip irrigation or a simple hand-watering schedule that targets the entire stack. Clean out any debris, rotate plants to avoid sunburn on one side, and inspect for pests. This keeps your stackable garden planters thriving and safe, with creative gardening projects that remain practical.
Can I customize block planter ideas for different spaces, and what supplies do I need?
Yes—block planter ideas can be customized for balconies, patios, or even indoors with the right setup. Start with a plan you can dry-fit, decide on height and width, and decide placement (sun vs shade). What you’ll need: hollow blocks, liners, landscape fabric, soil and compost, plants, a drill or tool for drainage holes, a level to keep stacks straight, waterproof sealant or paint if you want to shield blocks from weather, and optional plywood shelves for extra tiers. You can experiment with colors and patterns to fit your space, turning these block planter ideas into a true creative gardening projects—and a practical stackable garden planters system.
Related Topics
block planter ideas
stackable garden planters
DIY block planters
vertical gardening solutions
small space gardening
creative gardening projects
easy planter designs
beginner friendly
outdoor decor
container gardening
sustainable gardening
seasonal planting