
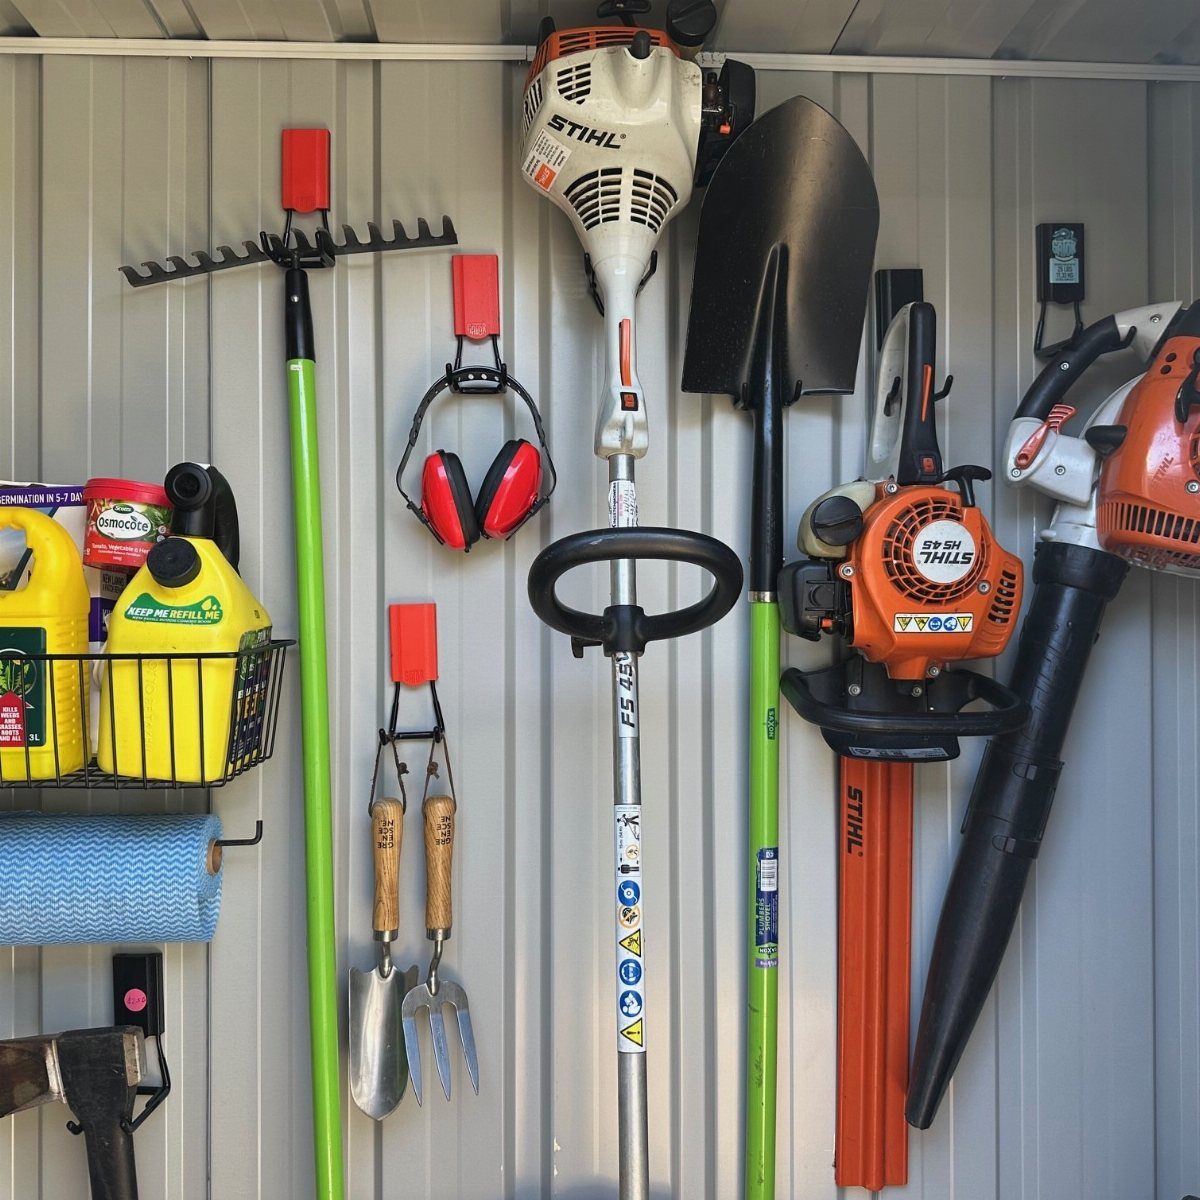
These 10 tidy shed storage ideas run from a roll of masking tape and twenty minutes to a full slatwall system with custom cradles, and the one that belongs in your shed depends on whether you are resetting a cluttered corner or building storage into a new setup from the start.
The proof is in the materials named throughout: plywood shelf boards chosen because shed humidity sags particleboard, magnetic strips with pull ratings you check before trusting a socket from height, and the PVC pipe sections you will see angled so long-handled tools lean back in the garden tool rack.
1. Adjustable Shelving

Wooden shelves with vertical slots let you move the boards up or down as your storage changes.
Slots let you move shelves up or down: one season you need tall space for patio furniture, the next you want rows of bins.
Before you build, check that your wall framing can take the load. OSB sheathing alone won’t hold; the uprights need to land on studs or blocking.
I would use plywood for the shelf boards, not particleboard. Shed humidity cycles will sag particleboard fast.

🏗 Stable 2400LBS Load Capacity : Engineered with high-strength iron, this heavy duty storage shelves unit supports up to 480 lbs per tier, totaling a massive 2400 lbs. Ideal for stowing heavy toolboxes, bulk pantry supplies, or spare tires without sagging. Whether you need garage shelving heavy duty or industrial storage racks, these shelves heavy duty provide a rock-solid foundation that remains stable

【48"W x 24"D x 72"H Spacious Storage】 The ultra-wide 48-inch footprint combined with an extra-deep 24-inch depth provides exceptional space for bulky items like tires, long tools, and large boxes. This five-tier heavy duty shelving unit is specifically designed to maximize every inch of your garage storage and industrial shelving space. Keep everything neatly organized, easily accessible, and free from clutter. Perfect for workshops, home storage, and heavy equipment.
2. Pegboard
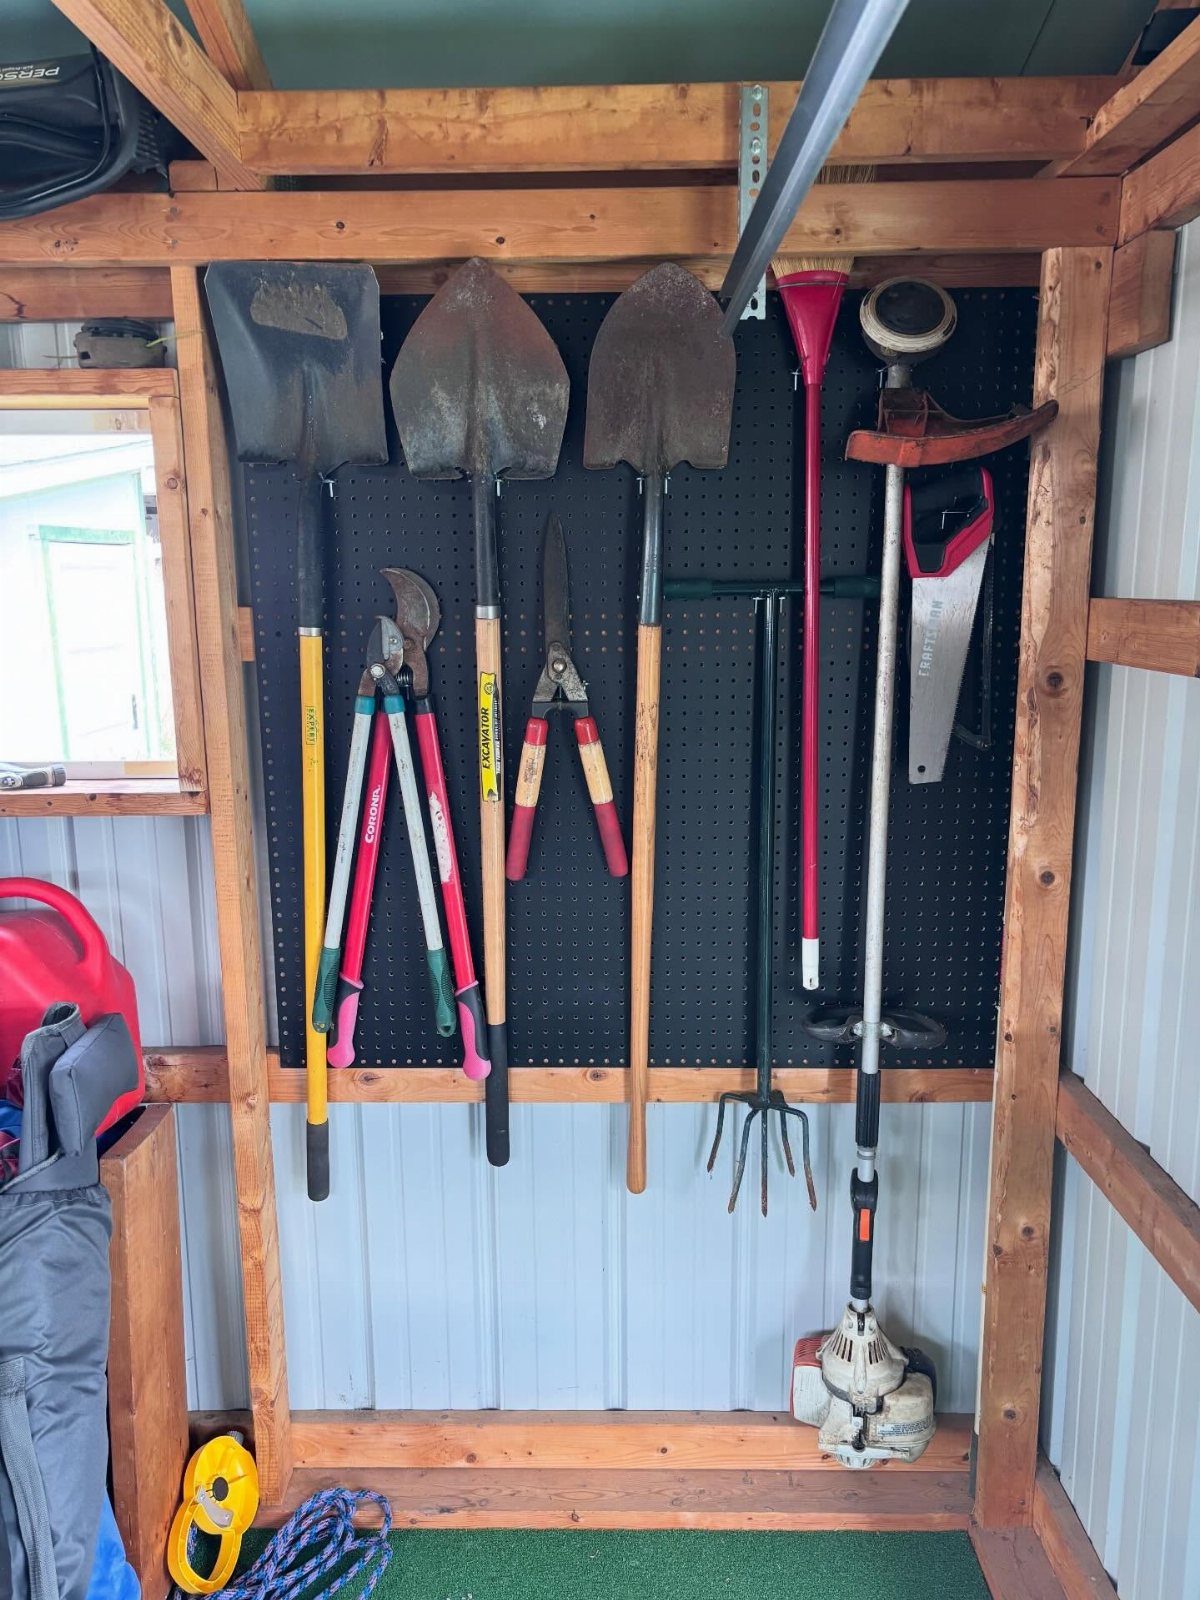
A pegboard turns any wall into flexible storage for long-handled tools that otherwise lean in corners and fall.
Black pegboard reads cleaner than the standard brown hardboard, and printed labels keep everyone in the household honest about where things go. What I’d check before buying: the weight rating per hook and whether your wall can take it.
Garden tools get heavy fast. For a wooden shed, lag bolts into studs beat the included wall anchors.

【Tool Organizers and Storage】: Our garden tool organizer is a versatile solution for decluttering your space. The DAOUTIME garden tool holder features 35 tool slots, offering a large capacity within a compact size. The three movable storage hooks provide additional hanging options. The unique storage holes are designed to accommodate various types and sizes of tools, perfect for gardening and lawn tools, as well as cleaning equipment. Equipped with height-adjustable feet, it is also suitable for uneven ground.

Heavy Duty Construction - The MADD Tools pegboard screwdriver organizer holder and wrench organizer holder set is made for heavy-duty use, providing a reliable and sturdy solution for your pegboard accessories.

HEAVY DUTY WALL MOUNTED TOOL RACK – BLACK COLOR – PACK OF 1 – Built from industrial grade steel with precision welded construction; this Garage Wall Organizer features a fixed one piece 36 inch rack with 4 PVC coated Hooks designed for secure tool storage; supports up to 250 lb capacity for garage wall storage systems garage storage wall garage storage wall mount heavy duty tool organizer and wall-mounted tool organizers use without bending or flexing
3. Magnetic Tool Holder
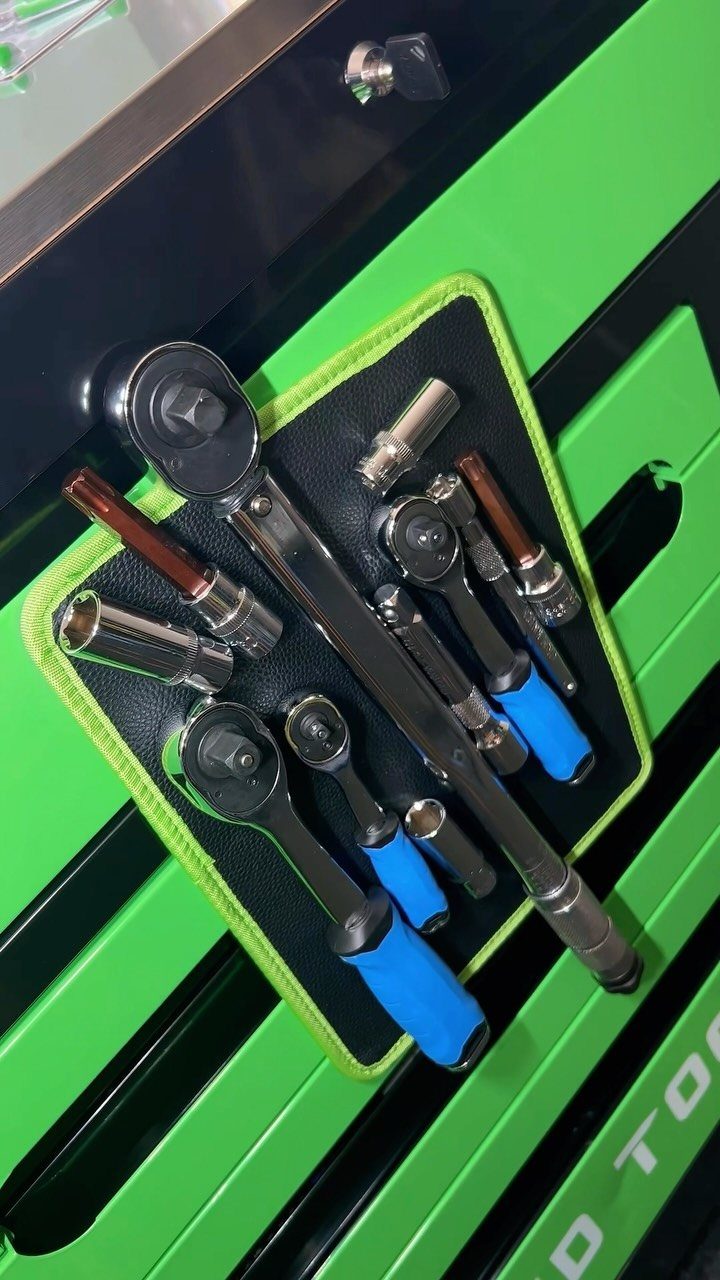
A magnetic strip or pad keeps sockets and bit drivers where you can see them, not rattling in a drawer you have to open.
A flexible magnetic strip wraps onto a tool chest side, which saves bench space in a small shed.
I prefer this for frequently used items; the magnetism is convenient but not strong enough for your only copy of an expensive wrench. Check the pull rating before you trust it with anything you drop from height.

Hex bit holder adapts any 1/4 inch hex shank bit to 1/4 inch drive ratchets, driver handles, and other drive tools

DURABLE STRENGTH - Built to last with Cr-V and S2 steel for maximum shock resistance and hardness, this set features deep nut drivers, reinforced wall thickness, and manganese phosphate coating for superior durability

Hex bit holder adapts any 1/4 inch hex shank bit to 3/8 inch drive ratchets, driver handles, and other drive tools
4. Heavy-Duty Storage Hooks
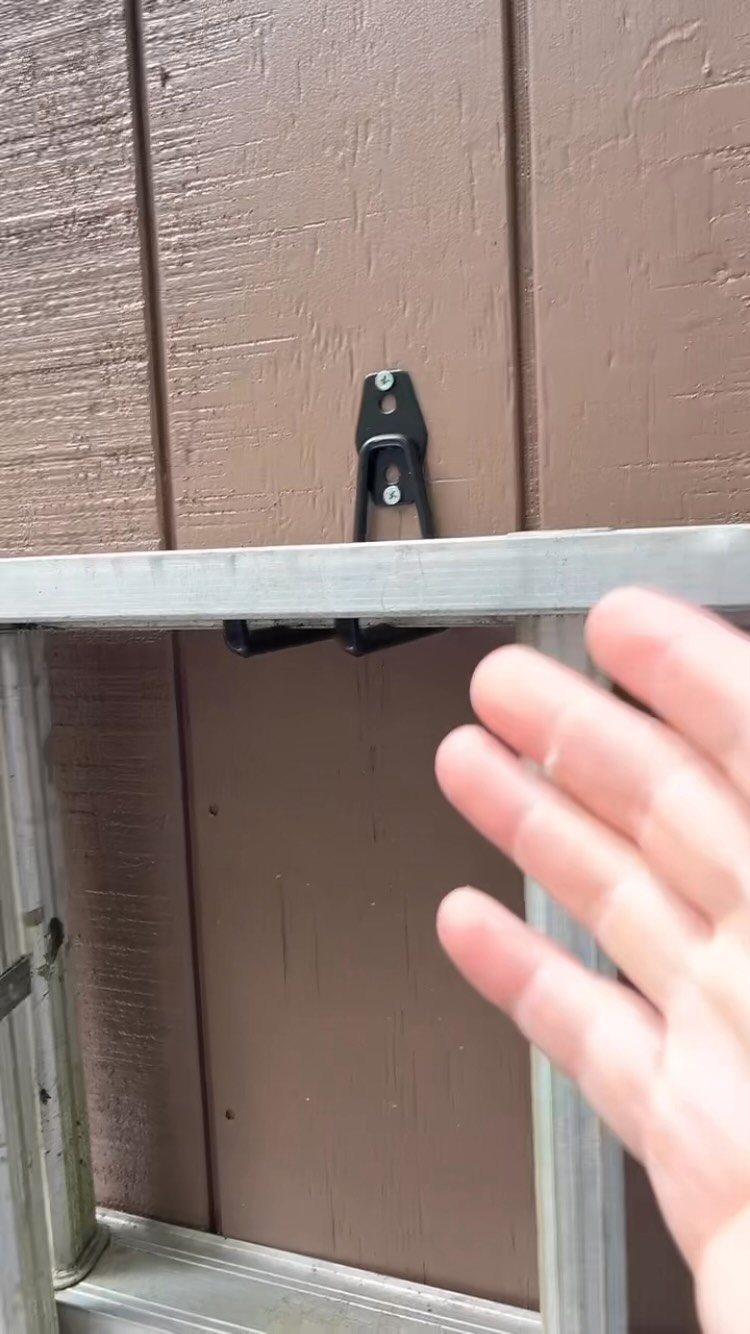
One heavy-duty hook rated for serious weight gets a ladder off the floor and frees the corner it was blocking.
Screw-mount hooks need solid backing; I would not trust drywall anchors or thin shed siding. A single centered hook works for straight ladders.
For step ladders or heavier extension models, 2 hooks spaced to catch both rails are worth the extra hole. Check the hook throat width against your ladder rail before you buy.

Versatile Storage Options: Our garage storage holders is perfect for hanging ladders, bicycles, folded chairs, tools, garden hoses, wire, sports equipment and other bulky items.
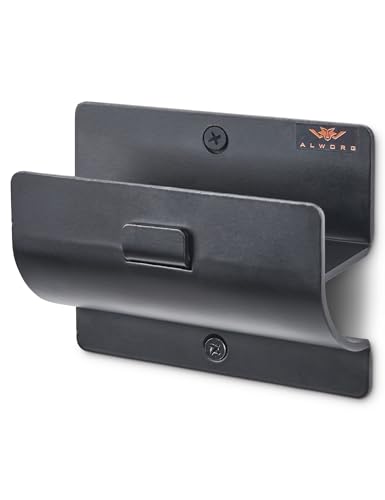
Crafted From The Premium Materials: This ladder hook is made from a premium, higher-grade metal compared to others in the market. The superior and thicker carbon steel is extremely sturdy and durable, for a long-lasting result. Size: 5"(L) × 3.87"(H) × 2.20"(W)

Heavy Duty Steel Construction: Made from reinforced steel, these wall mount ladder hooks provide strong and stable support for hanging ladders, folding chairs, and patio furniture. Built for long-lasting garage storage and organization.
5. Power Tool Storage Rack
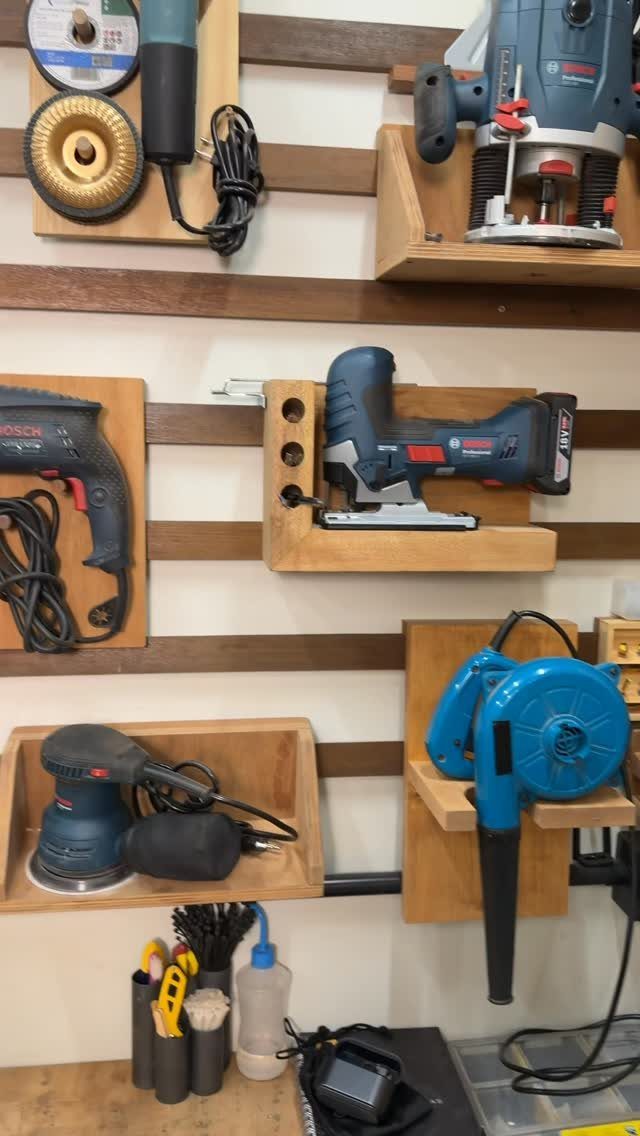
Custom wooden cradles on a slatwall let each power tool sit in its own spot with its cord or battery nearby.
A good rack handles the full range: drill, jigsaw, sander, small blower. What makes it work is the slatwall spacing; the holders slide to fit new tools without drilling fresh holes.
I would build the cradles from hardwood or quality plywood. Soft pine rounds over where tools rub, and you’ll relevel everything before long.

4-Outlet Power Strip:This garage shelf wall mount features an integrated 4-outlet power strip with a 6.5-foot cord for easy charging. Charge your tools directly on the shelf without the hassle of searching for outlets. By combining storage and functionality, this tool rack saves space while ensuring your power tools are always ready for use.

𝐏𝐑𝐄𝐂𝐈𝐒𝐈𝐎𝐍-𝐄𝐍𝐆𝐈𝐍𝐄𝐄𝐑𝐄𝐃 𝐃𝐈𝐌𝐄𝐍𝐒𝐈𝐎𝐍𝐒: Maviks upgraded 3-layer tool shelf rack comes with perfect dimensions for easy tool access. This tool organizer wall mount stands at 14.1 inches, offering enough space, along with a 7-inch mid-tier for large tools and Side Handles for protection on top shelf.

100% Heavy Duty Premium Metal, Thickened,Reinforced and Anti-Slip Design.
6. Potting Bench

A potting bench gives you a waist-high surface for repotting, a backboard for hanging small tools, and shelves for pots and amendments within arm’s reach.
Wicker baskets underneath hold bags of soil or fertilizer off the damp floor; I would add a sheet of galvanized metal or remnant countertop over the wood surface itself.
Soil moisture rots raw pine in a season. If your shed has no window, consider battery grow lights on that upper shelf for starting seeds.

【Extreme-Duty Shelving】This heavy-duty shelving measures 84"H x 55"W x 24"D,its core strength lies in its exceptional load capacity, with a total weight rating of 3000 lbs and each tier holding 600 lbs. This is achieved through 0.8mm thick reinforced double-layer posts and 4 additional support bars per tier, creating a structure far sturdier than ordinary shelves. It's ideal for storing heavy tools, car tires, and industrial parts
Shelves are ideal for storage and display needs

【62"W x 24"D x 72"H High-Capacity Storage】This garage shelving measures 62"W x 24"D x 72"H, providing an exceptionally spacious storage solution. It easily accommodates large, bulky items like tires, toolboxes, and long equipment, maximizing garage space while keeping your storage shelves neatly organized and within reach.
7. Hose Rack
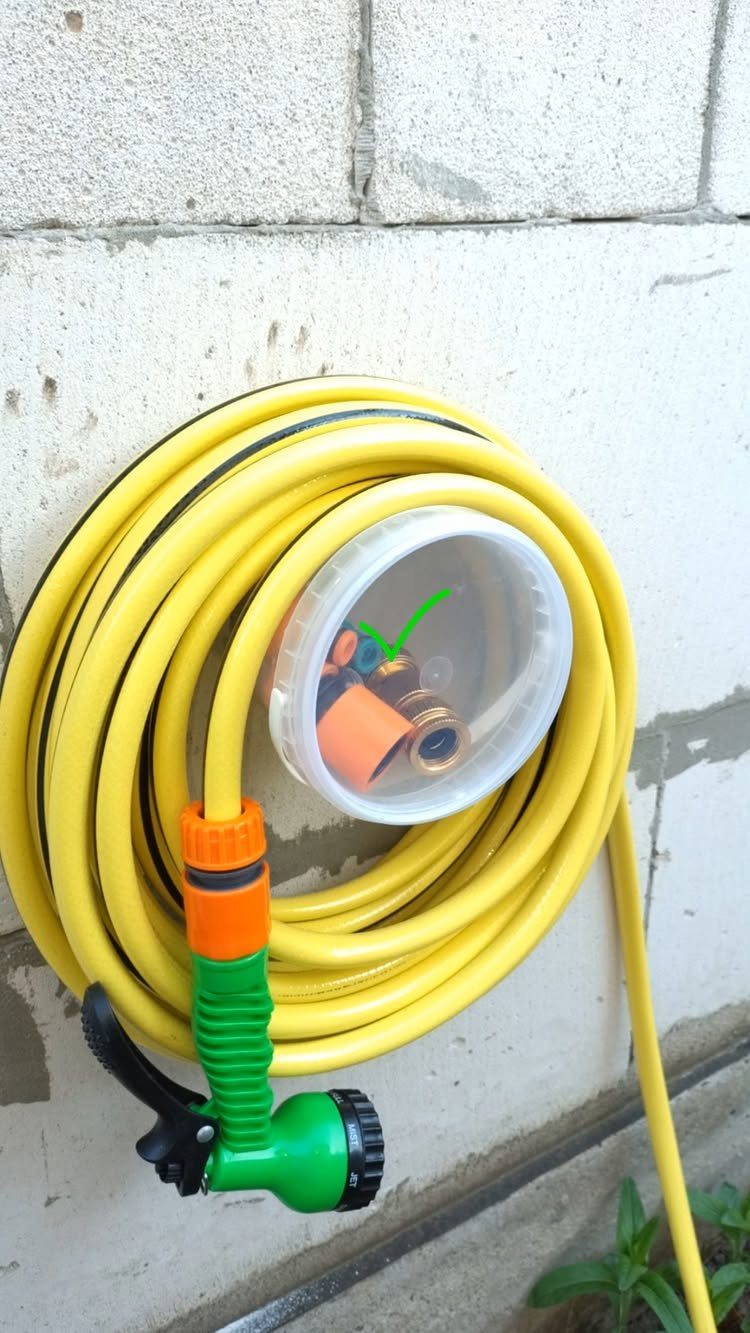
A wall-mounted rack keeps the hose coiled, off the ground, and ready to use without the kinks that shorten its life.
What I’d check before mounting: the backing material. A concrete block wall needs masonry anchors, not wood screws, and the spacing should let the coil sit clear of the lid so fittings store dry.
I would place it near the door you use most, because a hose you have to walk around the shed to reach ends up left in a heap on the lawn.

Wall Control metal pegboard is more than 10 times stronger than conventional pegboard
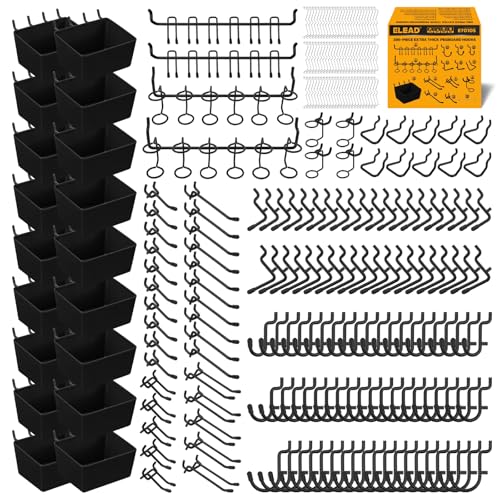
ULTIMATE VALUE PACK – A massive 286-piece bundle featuring 14 versatile hook types and 18 heavy-duty bins. Turn any pegboard wall into a fully equipped, clutter-free storage station—perfect for organizing tools, hardware, and small parts with ease.

4x W hanger with Industrial Strength rubber covered Magnet. Adheres to any steel surface. No tools needed. no drilling, no screws, Quick and easy assemble.
8. Wooden Slatwall Tool Organizer
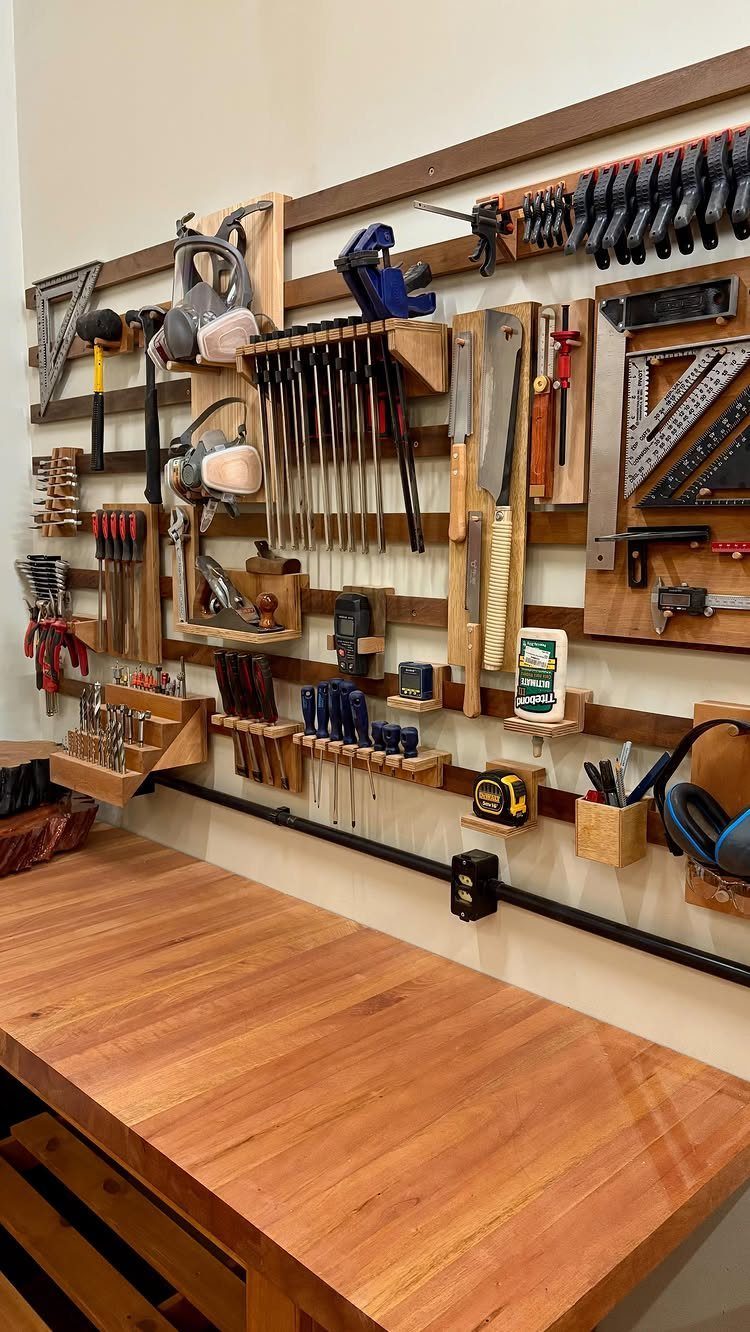
Horizontal maple or birch slats mounted above a workbench let you clip holders where you need them, then slide them as your tool collection changes.
The visible setup shows hand tools and clamps, but the same wall handles safety glasses, rulers, or a glue bottle in a shallow tray.
I would run the slatwall the full width of the bench, not just the center; the ends fill with the odd items that otherwise clutter the work surface.
Check that your wall can take the weight, slatwall plus tools plus the leverage of a pulled clamp adds up.

3-in-1 Impact Flip Sockets allow for quick switching between drive sizes

MULTI-FUNCTION FLIP SOCKET has both shallow (driver) and deep (bit holder) 1/4-Inch positions on one side and 5/16-Inch on the other

7-in-1 FLIP SOCKET SET: Includes 3 flip sockets and a 1/4-Inch bit holding feature to fasten screws
9. Garden Tool Rack
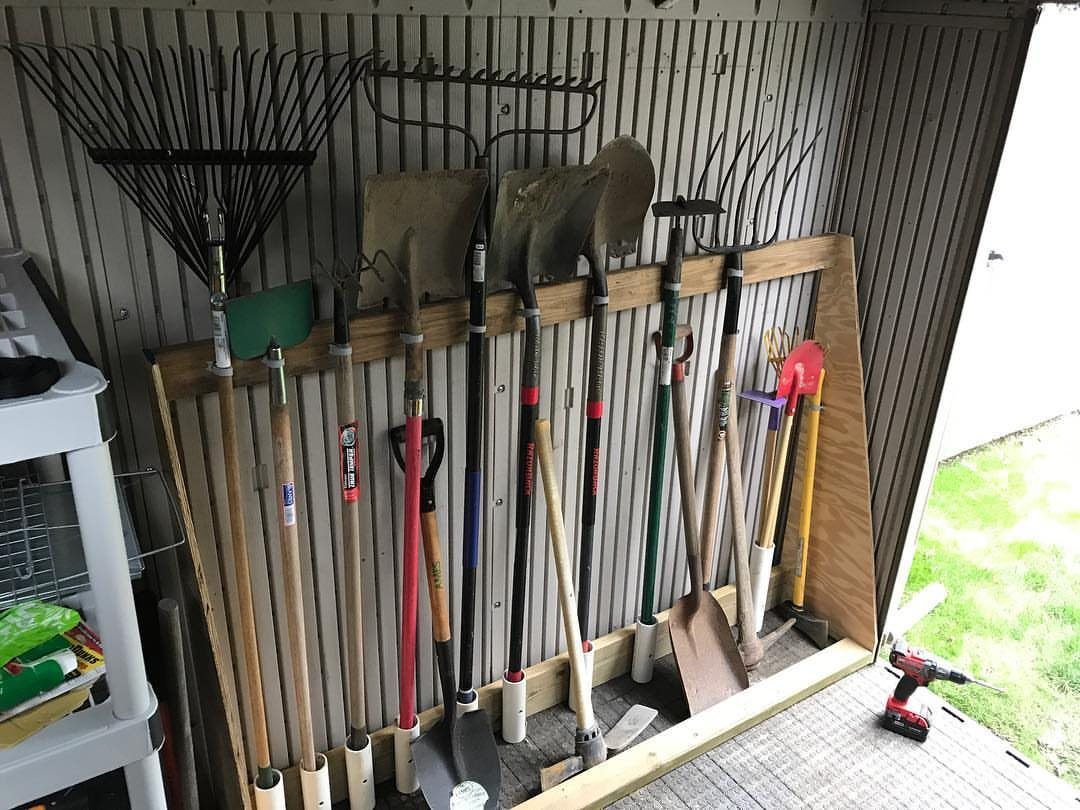
A wooden frame with PVC pipe sections at the base holds long-handled tools upright so the business end stays off the floor and the handles don’t tangle.
The pipe diameter matters: too wide and the tool wobbles, too narrow and mud on the blade jams it.
I would cut the pipe slots on a slight angle, not straight across, so tools lean back against the frame instead of pitching forward.
A cordless drill on the floor nearby suggests this is an active workspace; keep the rack low enough that you can lift a heavy spade out without catching the ceiling.

POWERFUL WEIGHT CAPACITY - Our Heavy Duty garage storage hooks are an essential item for anyone looking to maximize their storage space. With a weight capacity that's second to none, you'll be able to hang everything from bikes and ladders to shovels and strollers without worrying about them falling or bending the hooks. These garage hooks heavy duty are perfect for creating a garage storage system and are great garage hangers for wall mount hooks

HIGH QUALITY MATERIALS: Our heavy duty garage hooks(Two 5.1 Inch U hooks) are made from solid steel with anti-rust coating, ensuring durability and long-lasting use. The non-slip PVC sheath provides a secure grip, preventing items from slipping or getting scratched.

HIGH QUALITY MATERIALS: Our heavy duty garage hooks(Two 2.75 Inch U hooks) are made from solid steel with anti-rust coating, ensuring durability and long-lasting use. The non-slip PVC sheath provides a secure grip, preventing items from slipping or getting scratched.
10. Lumber and Scrap Wood Organizer
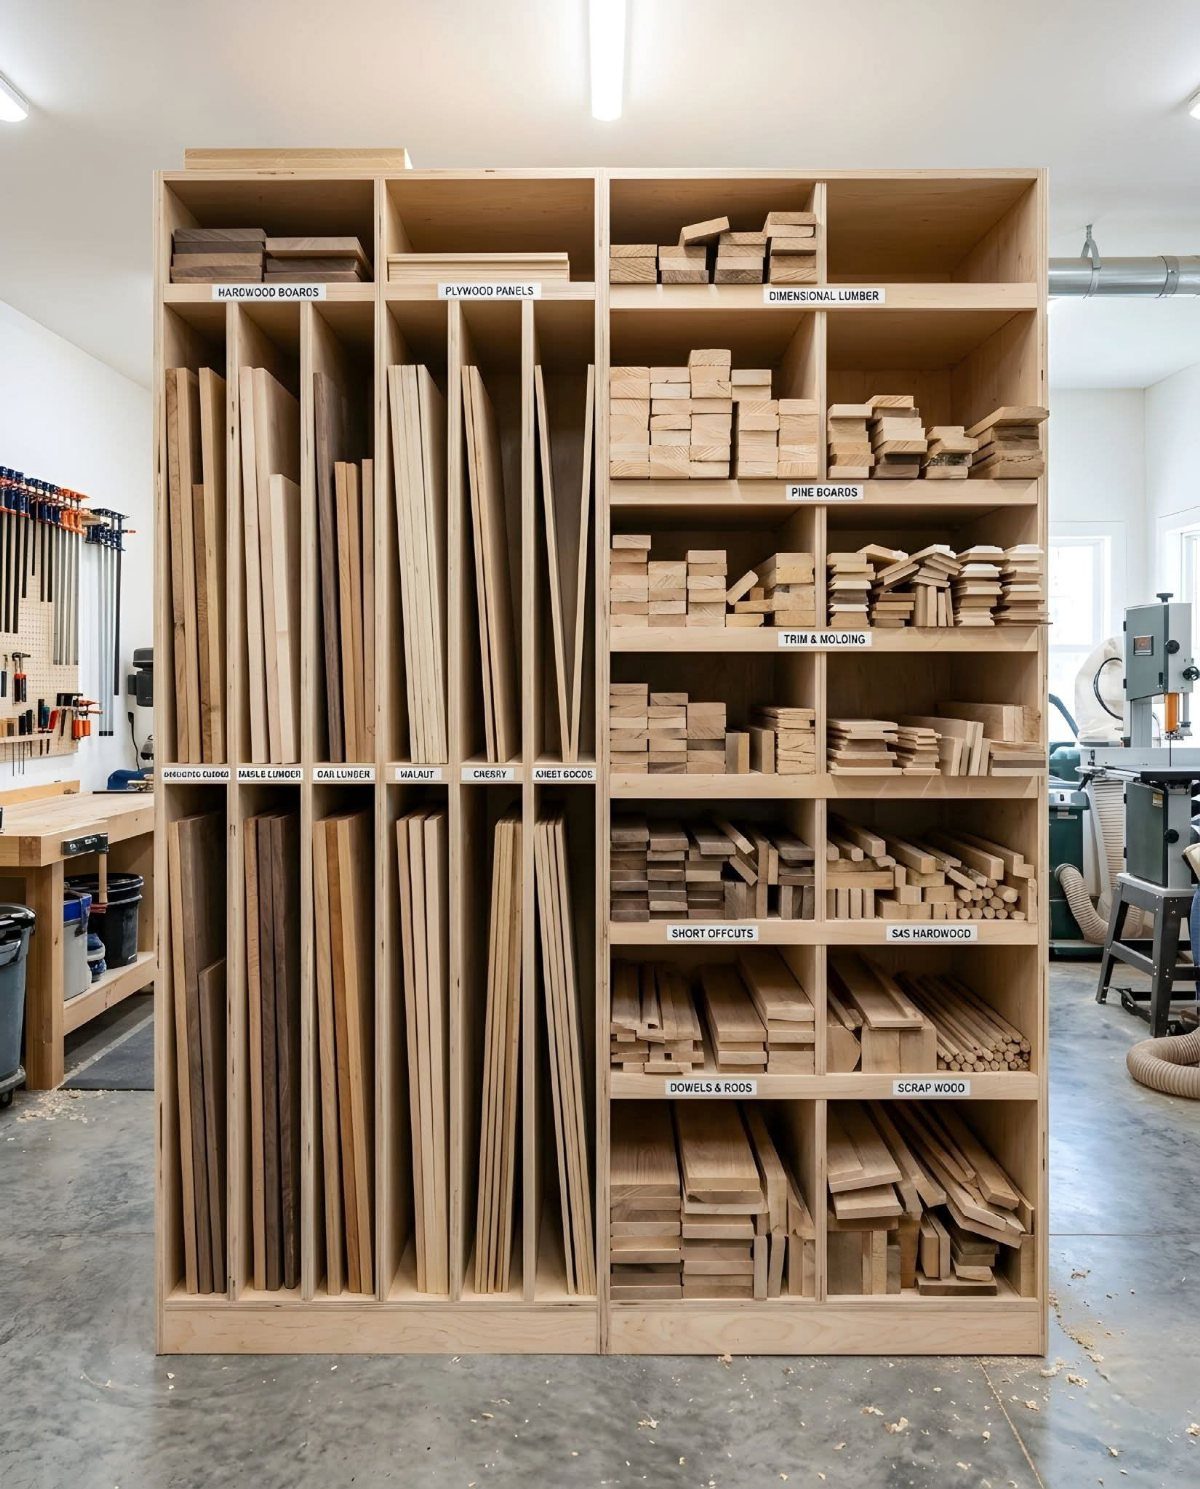
Vertical slots for sheet goods and horizontal cubbies for cutoffs keep lumber flat, visible, and sorted by type so you actually use the scraps you save.
Labels like "HARDWOOD BOARDS" and "SCRAP WOOD" only work if everyone puts things back; I would size the cubby depths to your longest common cutoff, not your longest ever, or the small pieces disappear in back.
Plywood construction is the right choice here, it stays flat under load and you can replace a divider when a forklift or a dropped board splits it.

✅【STORE MORE. CHARGE SMARTER】Tired of running back and forth to charge batteries? Meet Jaxon Power — a power tool organizer wall mount with a built-in 8-outlet charging station. Store your tools and power them up in one place. No clutter, no hassle — just a cleaner, smarter workspace.
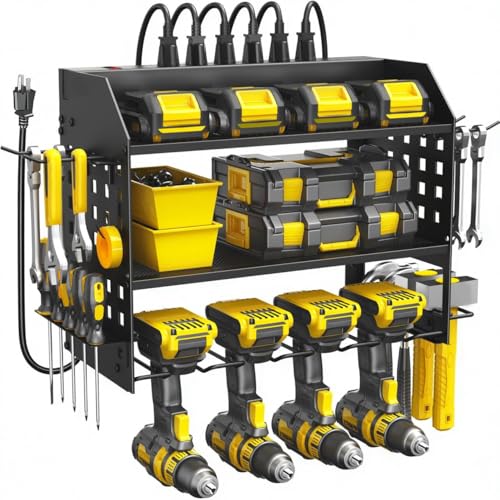
【Integrated 6-Outlet Power Strip】 The power tool organizer features a built-in 6-outlet charging station with a heavy-duty cord, allowing you to charge multiple cordless tool batteries (drills, impact drivers) simultaneously. No more tangled extension cords or searching for available wall sockets in your garage.

4-Outlet Power Strip: This garage shelf wall mount features a 4-outlet power strip and a 6.5-foot cord, allowing you to charge your power tools conveniently on the shelf. Say goodbye to searching for outlets—keep your tools powered and ready for use with this space-saving, multifunctional storage solution. It is perfect for keeping everything organized and easily accessible.
Decluttering Tips
I start every shed reset by emptying the whole thing onto the lawn, then sort into keep, donate, and trash before anything goes back in. Music helps; so does a hard timer.
I would set twenty minutes and work against it, because hesitation is what turns a Saturday project into a season-long avoidance. Bin bags, a broom, and gloves are the only tools you need for this phase.
Once the volume is down, your storage choices matter more.
The keep pile is what you actually touch in a year; everything else is optimism tax. I would be stricter with duplicates than with sentimental items.
Two nearly identical hand rakes means one goes. A shelf system you built for a different collection of stuff probably needs rethinking, not just reloading.
Sweep before you put anything back. Dirt migrates; starting clean means you notice when it returns.
Labeling Items
Labels fail when they describe what you hope the bin contains instead of what actually went in. I would write the label after filling, not before, or the bin becomes a fiction you stop trusting.
A label maker is fine; a permanent marker on masking tape is faster and easier to relabel when the contents shift.
Labels go on the short side of the bin, the one facing out into the aisle, not the lid you only see when you are standing directly over it. At eye level or slightly below catches attention without bending.
Categories work better when they describe task, not room of origin. "Potting" beats "garden" because it tells you when you will reach for it.
For multi-compartment bins, one word per slot; two at most. More text means smaller type, which means squinting, which means not reading.
Color can help, but only if you stick to it. I would pick one color for one category and accept that the system degrades the moment you grab the wrong marker in a hurry.
Regular Maintenance
A monthly twenty-minute cleanup is enough to keep a shed from backsliding.
I would put it on a calendar, same day each month, because waiting until you notice the mess means the mess has already cost you time hunting for things.
Remove trash first; it is the fastest visible win and it clears floor space for everything else.
Then walk stored items back to their labeled homes. One or two will have wandered; that is normal, and catching them early prevents the pile that swallows a weekend later.
Sweep last, when foot traffic is done.
I would check corners and under the workbench where debris collects and rodents investigate. A shed that smells clean gets used more; a shed that smells stale becomes storage for things you intend to forget.
If the timer rings and you are not done, stop anyway.
The point is habit, not perfection. Next month you will be faster.
Frequently Asked Questions
How to build a storage shed cheaply?
Pegboard does the most work per dollar of any single item in a shed, and it is where I would start if the budget is tight.
After that, a repurposed dresser or shelving unit, mason jars for loose hardware, and simple wall hooks cut from scrap lumber handle most of what a shed holds for less than one cabinet system would cost.
I would spend first on the pegboard and lag bolts, then add the rest as you see what you actually reach for.
What is the best storage solution for a shed?
The best sheds layer 3 things: wall storage like pegboard or slatwall, ceiling racks where the joists can take the load, and labeled bins on shelves you can move as needs change.
Every category needs one labeled home, or the system drifts.
What should you not store in a shed?
I would keep food, medicines, electronics, and flammable liquids like gasoline out of a shed.
The temperature swings and humidity ruin most medicines and electronics, and gasoline vapor in a small enclosed space is a hazard I do not want near a spark from a tool or switch.
