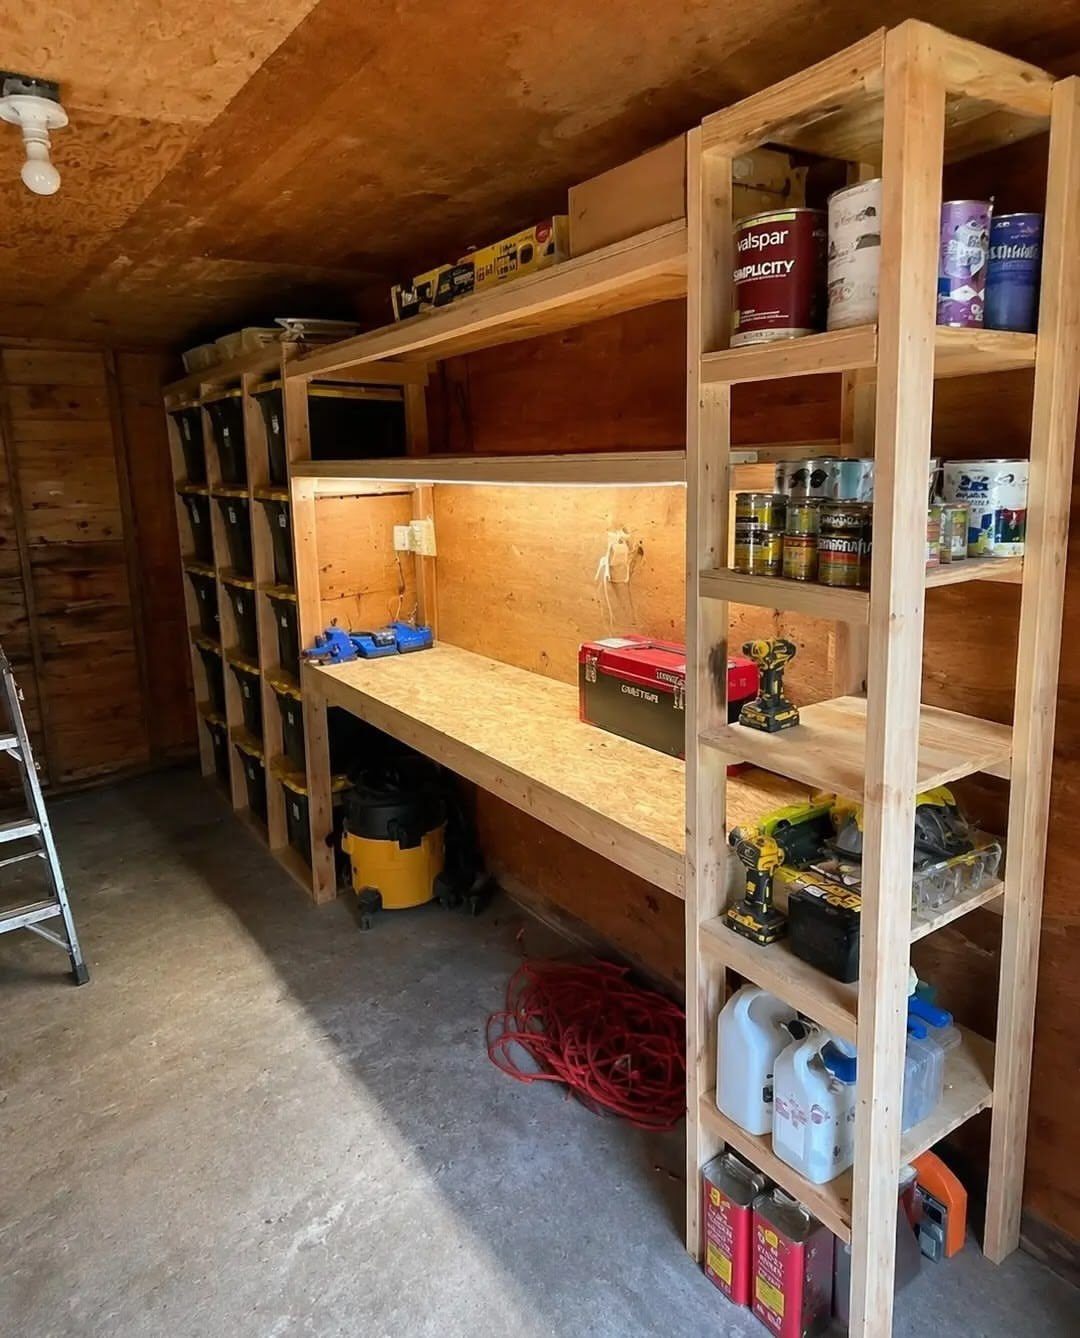
These 14 shed shelving ideas run from a single afternoon with scrap plywood to a full wall build that takes a weekend and a miter saw.
The one that fits you depends on whether your shed has solid walls you can screw into, or concrete block and corrugated metal that leave you building freestanding instead.
The 45-degree bevel on a French cleat is what makes the system worth the setup time: once that wall strip is level, every holder you add later slides on without a new hole.
1. Adjustable Shelf System
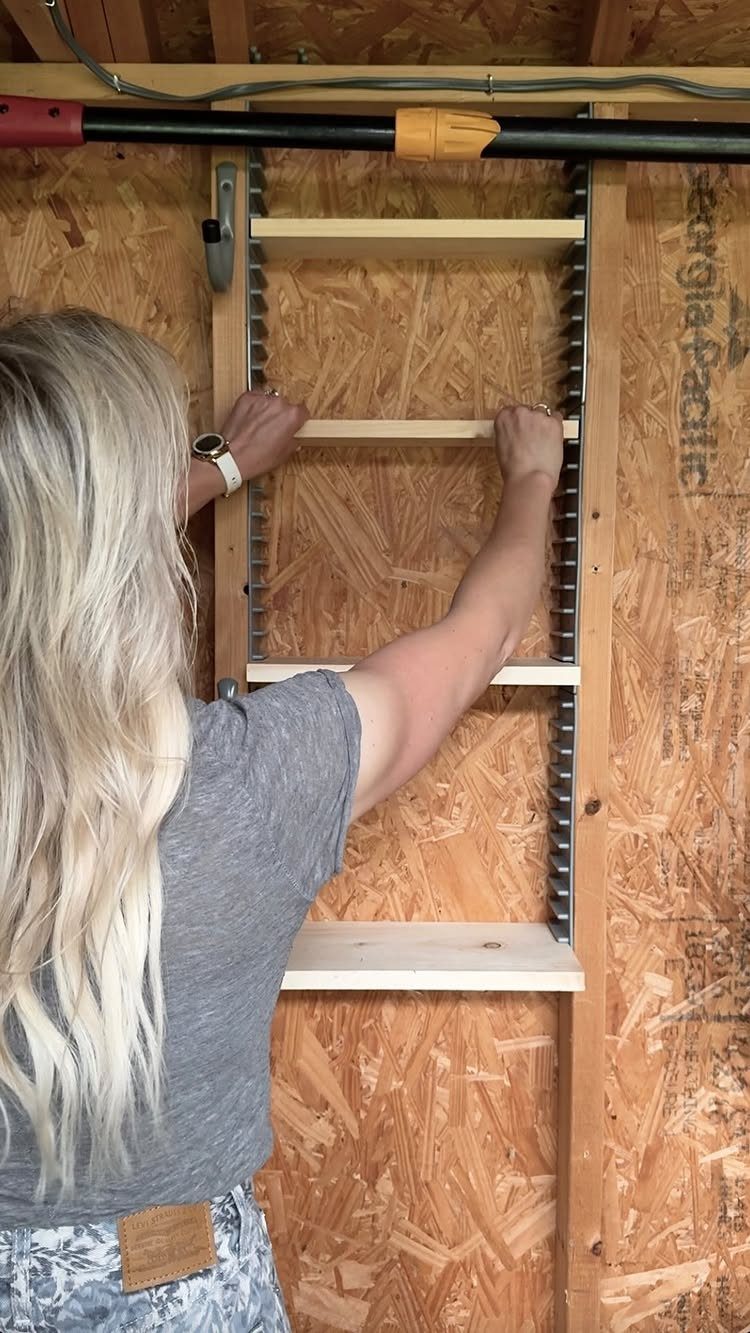
An adjustable shelf system lets you move boards up or down as your storage changes, which matters more in a shed than most rooms because the next project always brings different-sized gear.
The metal tracks screw to studs or blocking, and the brackets click in at whatever height you need.
OSB sheathing like Georgia-Pacific panels handles screws fine, but thin paneling needs backing boards behind it if you want the shelf to stay put.
I would start with 2 tracks and a single shelf, test the spacing with what I actually own, then add more boards once I know the heights that work.

YOUR ITEMS, YOUR WOOD – YOU SUPPLY IT: Supply 3/4" thick wood (e.g., 1x4 to 1x10 pine or plywood, sold separately) for custom-fit shelves that match your items.

Sturdy Shelf Pilaster: Our metal shelf standards with silver coated finish, the high quality alloy steel has excellent oxidation resistance and rust resistance, stable and sturdy than normal shelf storage. The super long metal shelving design allows you to put more items

Designed to support wood shelves 11-inches to 14-inches deep. Brackets sold individually and hardware/tracks not included
2. Storage Wall Pegboard
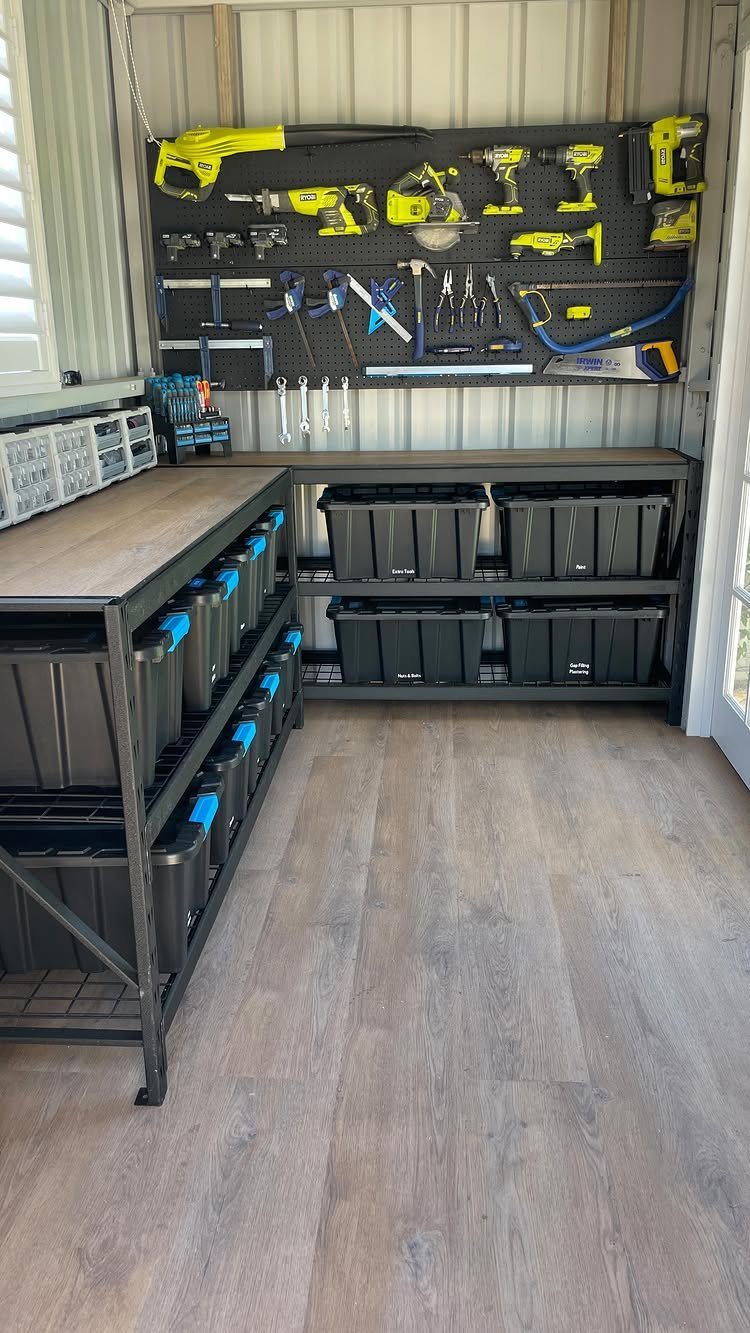
Pegboard turns an empty wall into storage without building anything box-shaped, which keeps a small shed feeling open. A black pegboard is a step up from the standard brown masonite; it costs more but reads as finished rather than temporary.
Mount it with standoffs so hooks seat properly, and plan the layout before you drill. I group by task: cutting tools in one zone, fastening in another, with the bins I reach for most sitting on the shelf directly below.
The weak spot is weight; heavy items need a shelf or cleat, not a peg hook alone.
Pre-drill the edges of the 2x4s with a 3/16-in. drill bit. About every six inches, screw in threaded two-inch L-hooks to match the holes in your pegboard.

Specification: Material: ABS Plastic; Spacer ID: 8.2mm / 5/16 inch; Spacer OD: 14mm / 9/16 inch; Spacer Length: 10mm / 3/8 inch

Superior Durability Pegboard Wall Organizer:Crafted From High-Quality Abs Plastic, Our Pegboard Panels Are Thicker, Sturdier, And Built To Last. With Reinforced Skeleton Strips On The Back Of Each Peg Board Shelving, They Can Support Up Total 60 Lbs When Installed Properly. Far Superior To Wooden Peg Board。Perfect For Storing Tools, Accessories, And Crafts, Compared To Metal Pegboard Panels While Ensuring Long-Lasting Performance Without Rust Or Breakage.

Heavy Duty Industrial Strength: Spampur metal pegboard panels are made of premium cold-rolled steel with a powder-coated finish — strong, scratch-resistant, and easy to clean. Each panel supports up to 70 lbs, so your tools stay firmly in place without shaking or falling. A true heavy duty pegboard that outperforms plastic or wooden alternatives.
3. Four-Layer Shelves
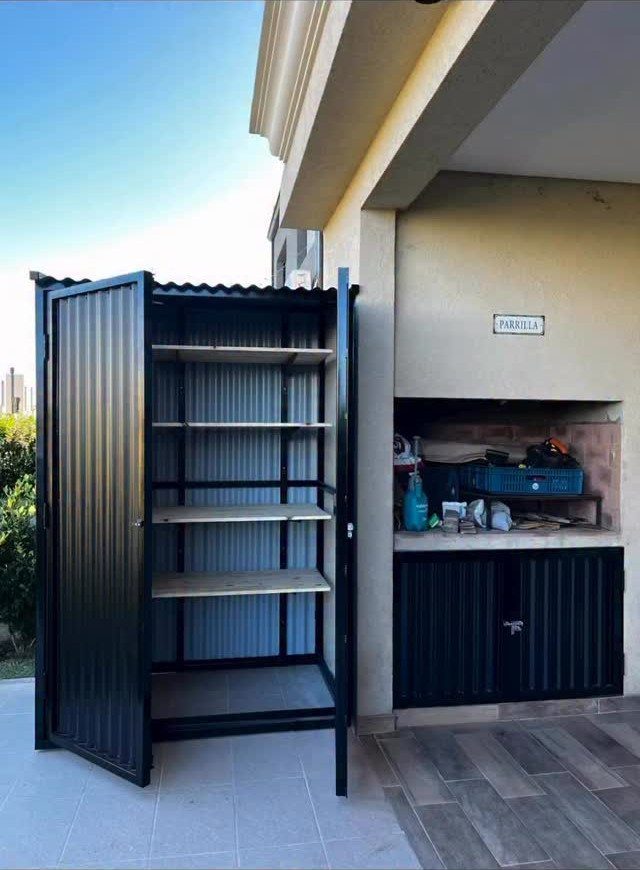
4 layers inside a corrugated metal cabinet give you enclosed storage that still breathes, which suits potting mix, fertilizers, or anything that sheds moisture or smell.
A black metal frame with wood shelves is a common pairing for shed storage; the metal sheds water, the wood is cheap to replace when it eventually stains.
Check the shelf span before you load it; 24 inches is about the limit for 3/4-inch plywood without sag under real weight.
I would use this for light, bulky items up high and keep the heavy stuff on the bottom tier where the frame does the work.

TALL STORAGE FOR SMALL SPACES — The 62.2-inch vertical design adds useful storage while keeping the footprint compact, making it a practical fit for covered patios, porches, balconies, garages, and narrow corners.

Easy Assembly: Wire Shelving features a user-friendly design, requiring no specialized tools for assembly. You can quickly set up the desired storage space, saving time and effort.

【Hidden Shoe Cabinet for Entryway】: This large capacity narrow shoe cabinet (31.5”W x 9.5”D x 37.4”H) fits tight entryways. Its two flip drawers store 12-16 pairs. Shelves can be adjusted or removed via grooves to fit flats, heels, or boots. The raised bottom (approx. 6.3”) allows robot vacuum access. The spacious desktop can store wallets, keys, plants, etc., allowing you to access items more easily
4. Rustic Style Shelves
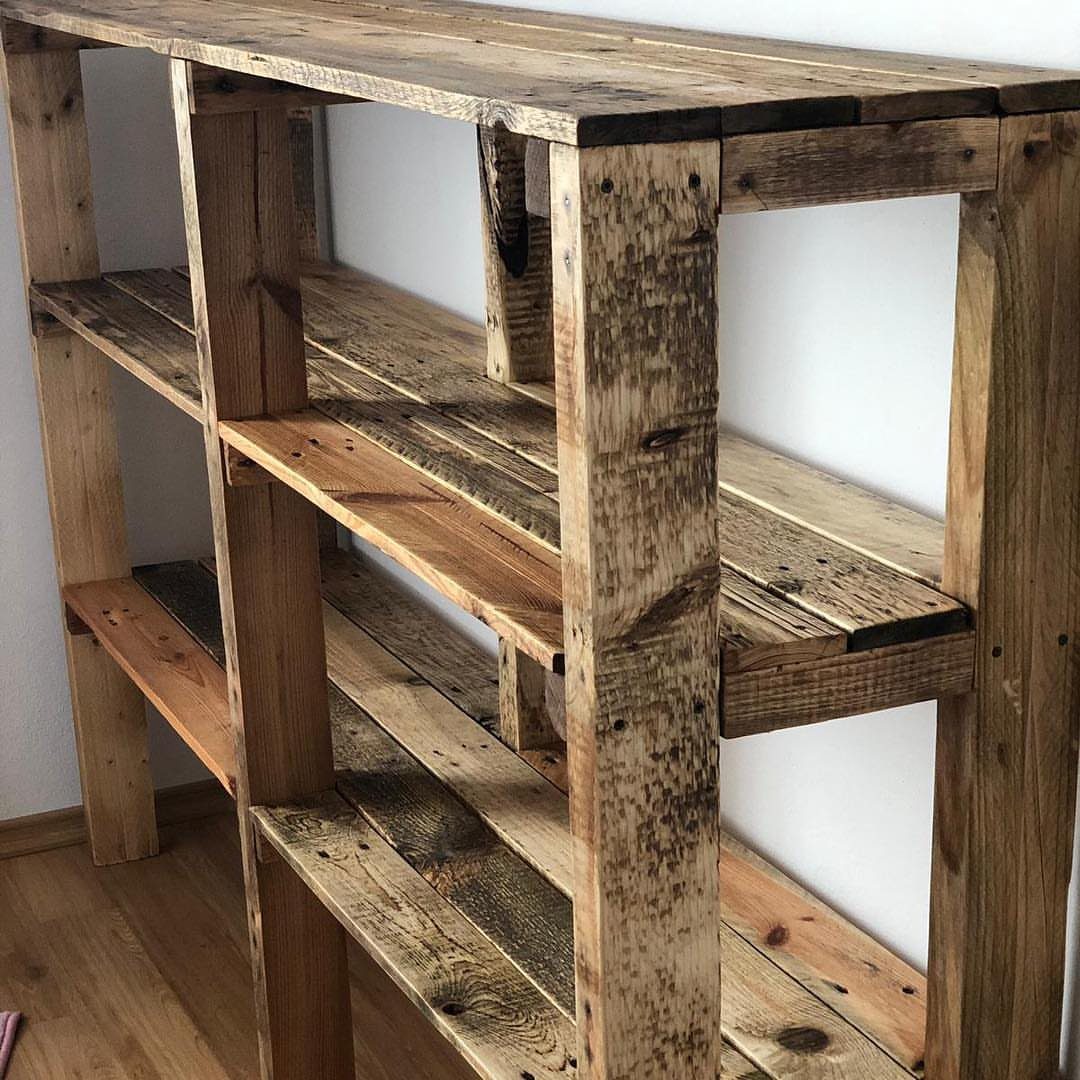
Weathered pallet wood has gaps, knots, and odd widths that make it a poor choice for fine work but exactly right for shelves that are meant to look like they came from somewhere else.
Rustic wood shelving works best against a plain wall; busy wood against busy wallpaper fights itself.
Sand enough to lose splinters, not enough to lose character. I would seal with a matte exterior finish if the shed gets damp, or leave it bare if the space stays dry and I want the gray to keep deepening.
Either way, level it with shims; reclaimed wood rarely sits flat on its own.

[ What You Get ] : 2 pairs 2 Inch french cleat picture hanger X 4 pieces self-tapping screws X 4 pieces self drilling screw X 4 pieces expansion rubber plugs X 4 pieces clear bumpers

【Secure Decorative Hook】: Our French cleat picture hangers are made of high-quality aluminum alloy, never rusting, ensuring strong support and long-lasting durability. Its innovative design incorporates the French cleat hidden hook technique, securely fastening your picture frames to the wall, preventing wobbling and instability.

SUPER STRENGTH: Each 6 inch french cleat holds frames of all sizes, supporting up to 50 pounds. The set includes three pairs of aluminum pieces, so this heavy duty french cleat hanger is ready for the antique frames, mirrors and art you have had put away all these years.
5. French Cleat Tool Shelves
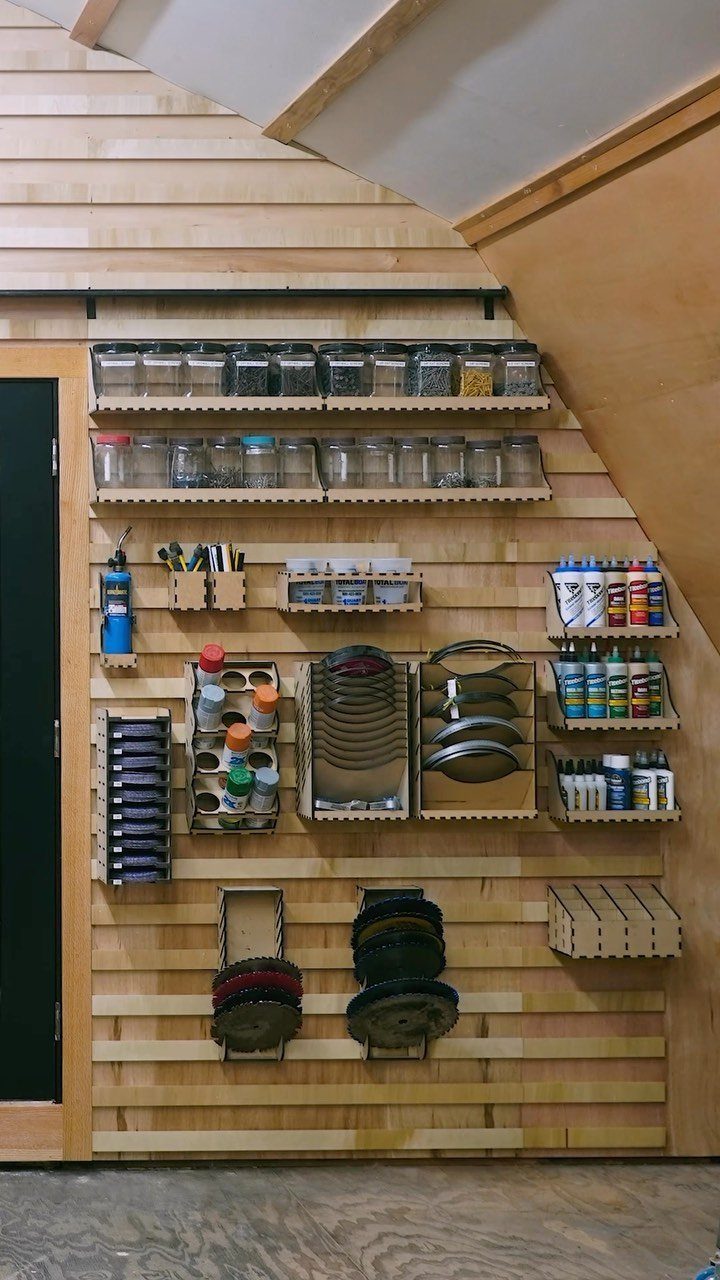
A French cleat is simply a beveled board ripped at 45 degrees, one half screwed to the wall, the other to whatever you want to hang.
Laser-cut tool holders are a nice touch, but the system works with plain plywood scraps and a jigsaw if you are patient.
What sells me on cleats for tool storage is the ease of rearranging; yesterday’s spray paint shelf becomes today’s sandpaper station without new holes in the wall.
Everything needs its own back cleat, so there is upfront labor before you can hang a single tool. I build a batch of blanks on a slow afternoon, then customize as needs show up.

Set of 3 — These brown shelves for wall measure 17" x 6" x 0.6", are made of Paulownia, and support up to 25lbs per shelf. The included template with bubble-level and QR code for the installation tutorial video makes installation easy and precise.

Solid reclaimed wood construction. Each shelf is made from real reclaimed wood with natural variation in color, grain, and character due to previous use and aging
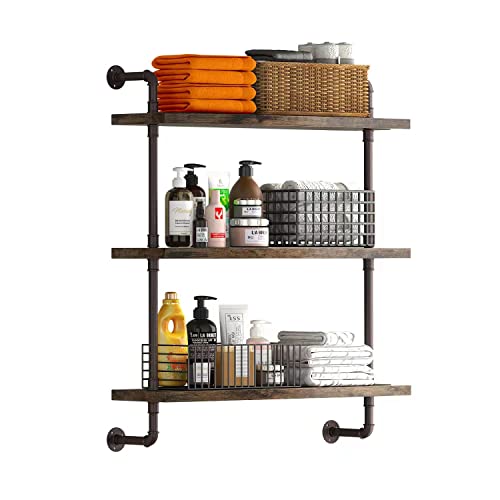
【Retro Style】Rustic industrial pipe shelf in bronze finish. Iron pipes and wood composition in vintage style. great for storage and decorations. It can also be used outdoors. Extensively anti-rust treatment.
6. Shelves with Worktop
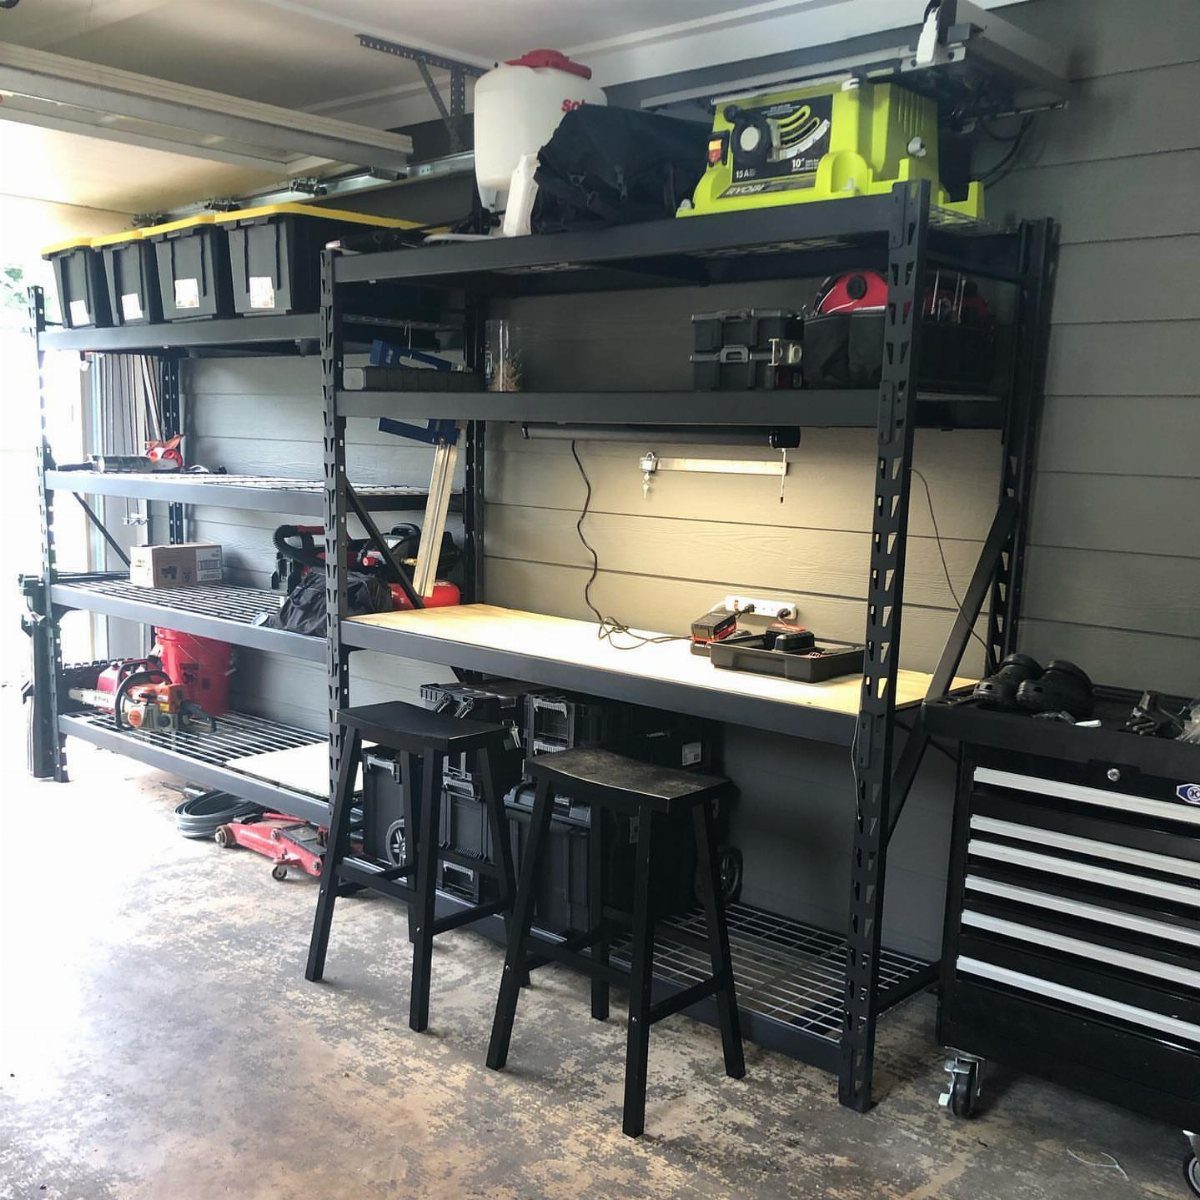
A worktop built into shelving turns storage into a usable bench, which matters when your shed is too small for separate pieces. I would want locking casters or a fixed base, not the wobble that comes from half-measures.

SHELFTRACK BRACKET: Exclusively designed for ClosetMaid ShelfTrack hang track and standard system for adjustable shelving

High quality material:pilaster shelf brackets are made of #45 carbon steel with galvanized finishing, long-lasting and rust resistant.

Complete Hardware Set: Includes 8 stainless steel Shelf Pilaster Tracks (40" each), 32 aluminum alloy Shelf Clips, 40 mounting screws (5 per strip), and 40 suction cups for glass shelves. Suction cups are not required for wooden shelves
7. Wall of Shelves
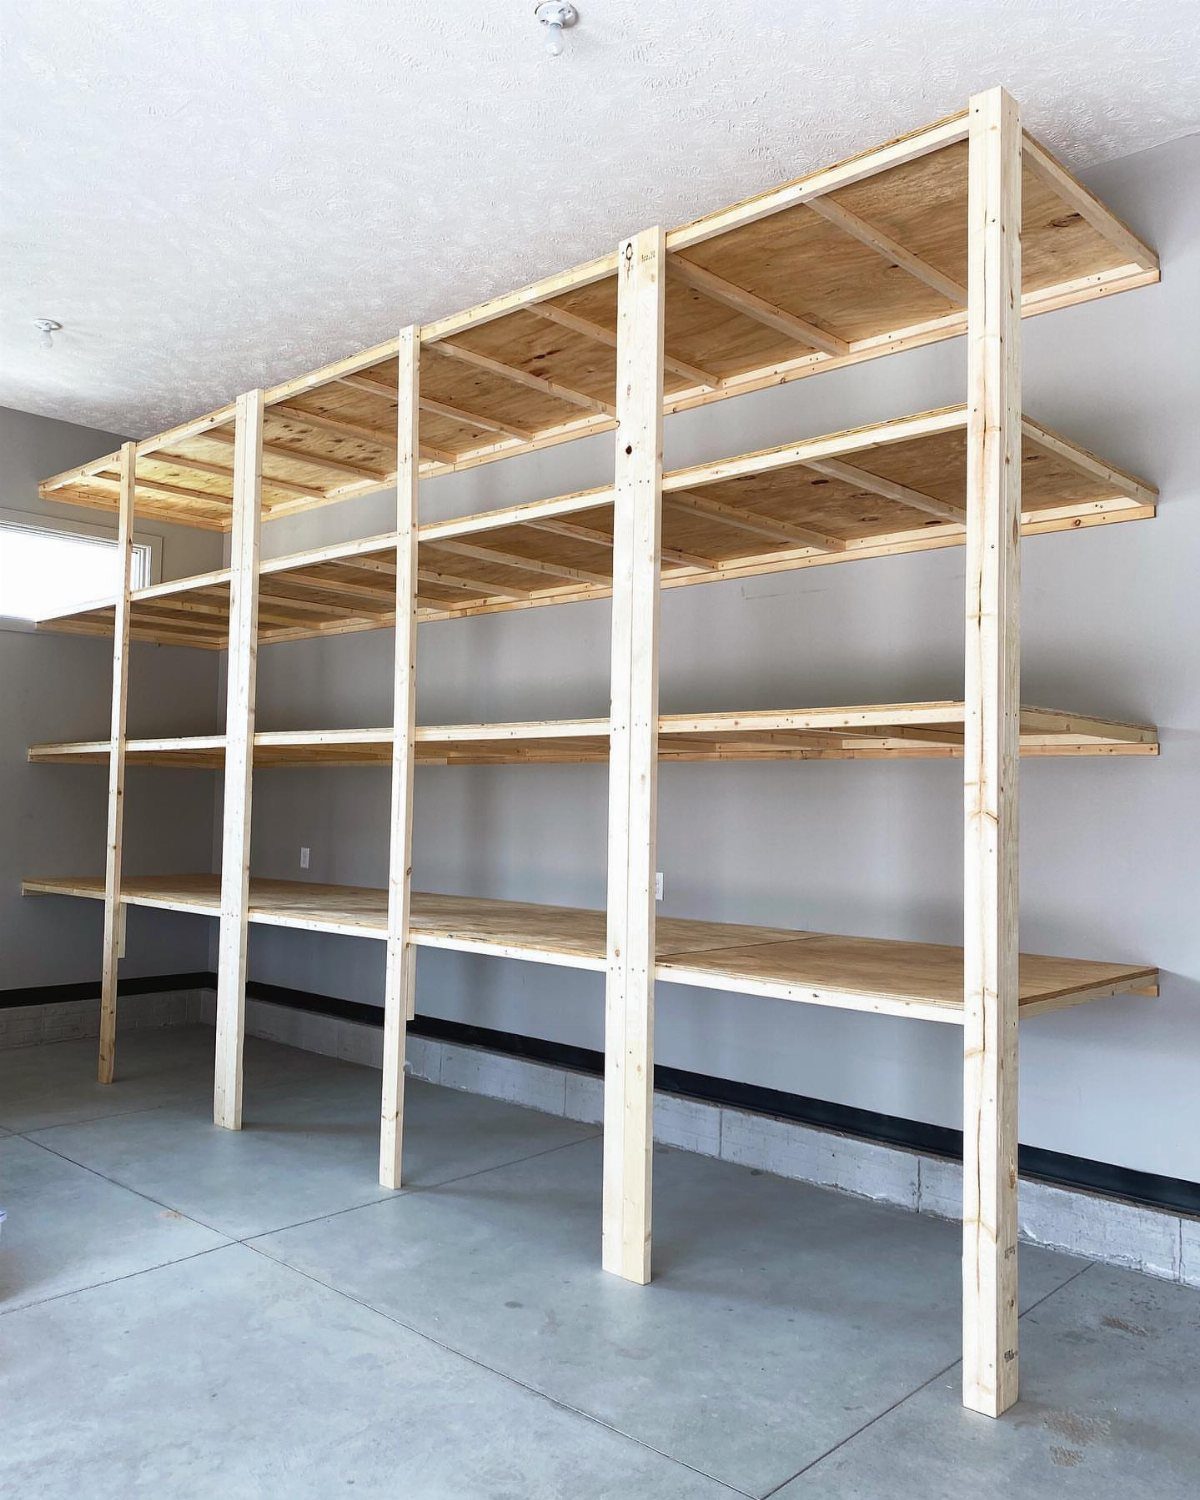
A full wall of 2×4 and plywood shelving turns the long side of a garage or shed into one continuous storage plane, which beats stacking bins when you need to see everything at once.
The span is the decision: running long shelves without a vertical partition asks more of the shelf boards and the wall anchors than most people expect.
I would build in a vertical support at regular intervals, even if it breaks the clean horizontal line; sagging shelves are harder to fix than an extra upright is to install.
Check that the floor is level before you stand the end frames, or the whole row tilts.

METAL NAILBOARD: Our peg board panels are made of high quality steel with a powder coated finish that is strong, scratch resistant and easy to clean. Each small pegboard has a weight capacity of up to 50 lbs. This is a favorite product for tool organizers, DIY enthusiasts, store owners and office workers.

DISPLAY YOUR ITEMS - These hooks are great for hanging and organizing necklaces and other jewelry.

Upgraded Storage Solution: This peg board kit provides ample space and flexible layouts for organizing your gaming setup accessories, making your gaming room more efficient and clutter-free.
8. Potting Shelves
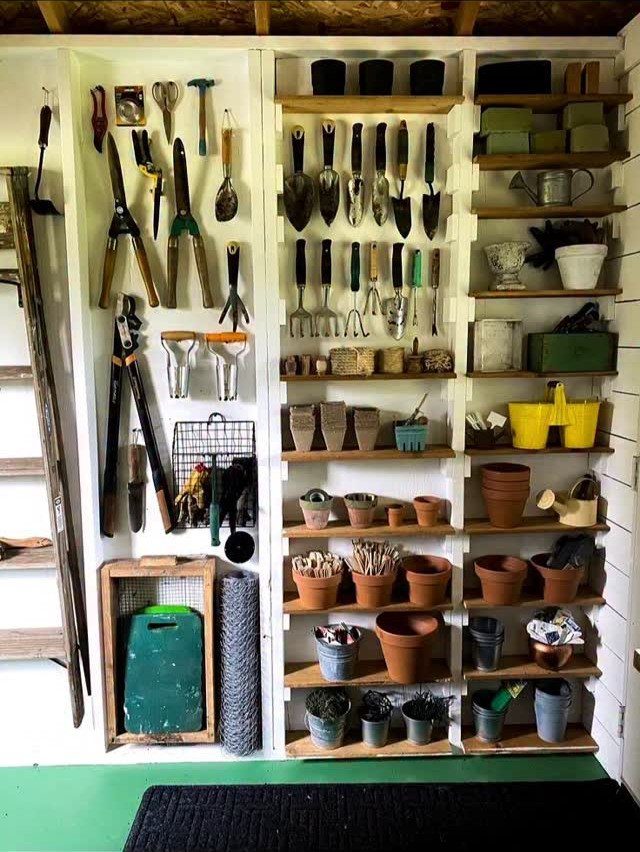
Open shelves between exposed studs give a potting shed its own rhythm: the wall itself becomes the unit, no back panel needed, just boards cut to fit the bays.
Terracotta and metal tools sit well here because air moves freely and damp soil dries instead of souring.
I would paint the studs and wall with exterior-grade white before adding shelves; bare framing gray looks unfinished fast in a garden space.
Open bays mean no doors to keep potting mix contained, so dust is the cost. If the shed doubles as storage for anything finished, add a simple curtain on a tension rod below the lowest shelf.

INDUSTRIAL AND MINIMALIST STYLE: Stripping away of all unnecessary elements and focusing on what needs to be there, this vintage bookshelf with industrial-inspired details and simplicity clean lines, makes your space look more neat, generous and comfortable.

【Distinctive Fluted‑Panel Design】This modern Sideboard features unique corrugated fluted panels that blend Art Deco with mid‑century modern aesthetics. Premium MDF construction paired with elegant metal handles delivers extra sophistication to refresh your home decor, overall dimension measures 55.10 L x 15.70 W x 31.80 H inches with total weight of 93.50 lbs

【Distinctive Fluted‑Panel Design】This modern Sideboard features unique corrugated fluted panels that blend Art Deco with mid‑century modern aesthetics. Premium MDF construction paired with elegant metal handles delivers extra sophistication to refresh your home decor, overall dimension measures 55.10 L x 15.70 W x 31.80 H inches with total weight of 93.50 lbs
9. Sliding Bins Garage Storage Wall
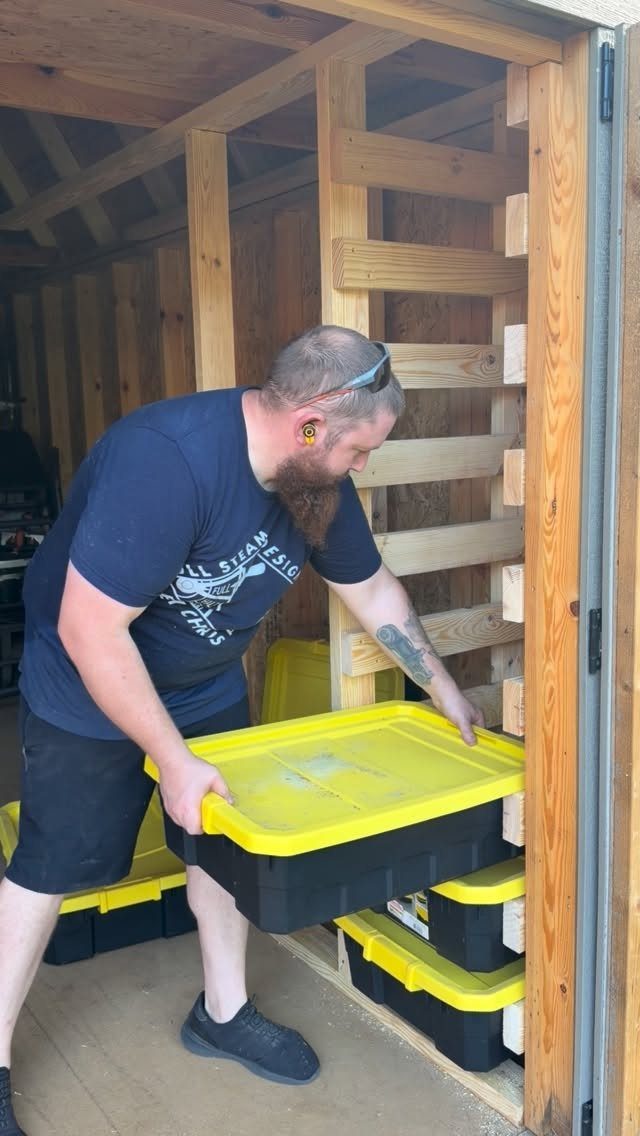
Wooden runners built into a slatted wall let plastic totes slide in like drawers, which keeps the contents visible and the floor clear.
The system uses totes sized for serious storage; the builder planned for a full run of them, which tells you the wall needs real depth and the runners need spacing matched to the tote footprint before you cut anything.
I would build one bay as a test, load it, and slide it fifty times before committing to the full wall. Tote lips vary by brand; mixing brands on the same runners is a frustration I would avoid.

[𝐅𝐫𝐞𝐧𝐜𝐡 𝐜𝐥𝐞𝐚𝐭 𝐰𝐢𝐭𝐡 𝐕𝐞𝐫𝐬𝐚𝐭𝐢𝐥𝐞 𝐌𝐨𝐮𝐧𝐭𝐢𝐧𝐠 𝐎𝐩𝐭𝐢𝐨𝐧𝐬]: Our 6-inch French cleat hanger provides a flexible solution for various applications, from hanging art to whiteboards and cabinets.

【ULTRA-STABLE INTERLOCKING DESIGN】 Tired of crooked frames or wobbling mirrors? Our French cleat hanger features a precision Z-bar interlocking system that provides a flush, secure mount. The 12-inch profile is specifically engineered to distribute weight evenly, ensuring your heavy wall decor stays exactly where you put it without the risk of fa
10. Rolling Storage Shelves
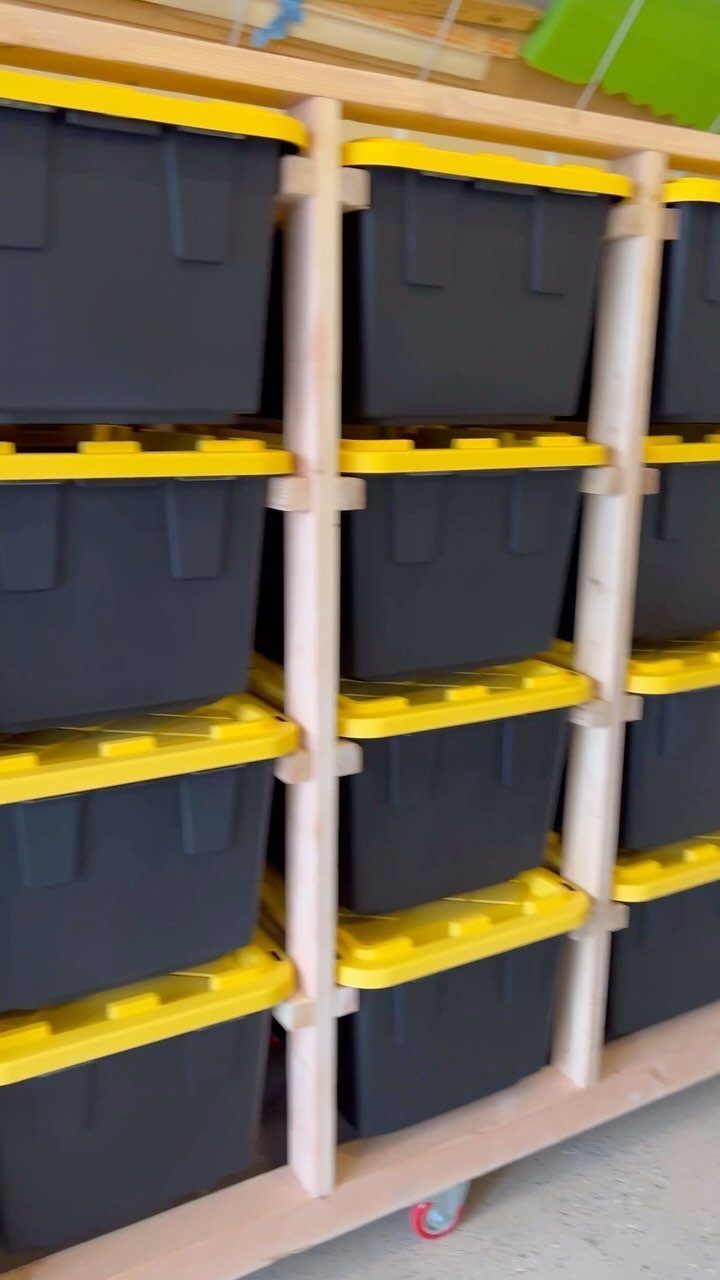
A plywood rack on heavy casters turns fixed shelving into something you can reposition for projects or roll outside to hose down.
I would bolt, not screw, the caster plate to the frame; particle board strips under plywood compress and tear out.
Locking at least 2 wheels is non-negotiable on anything over waist high. Mobility only matters when you actually want it.

【Varied Floating Shelves】- Let's use our creativity and imagination! The uniquely designed matte surface metal triangular bracket can be installed on the top or bottom of the shelf. Natural wood color with white is suitable for a variety of minimalist and scandinavian home styles.

3-PIECE SHADOW BOX SET: Reclaimed wood shadow box shelf allows you to display your favorite possessions in any room

Versatile Suncast Shelf Kit: Designed for Suncast sheds to expand storage space. Wall mounted shelves help organize tools, bins, and gear in garage, shed, and utility areas.
11. Custom OSB Tool Organizer Wall
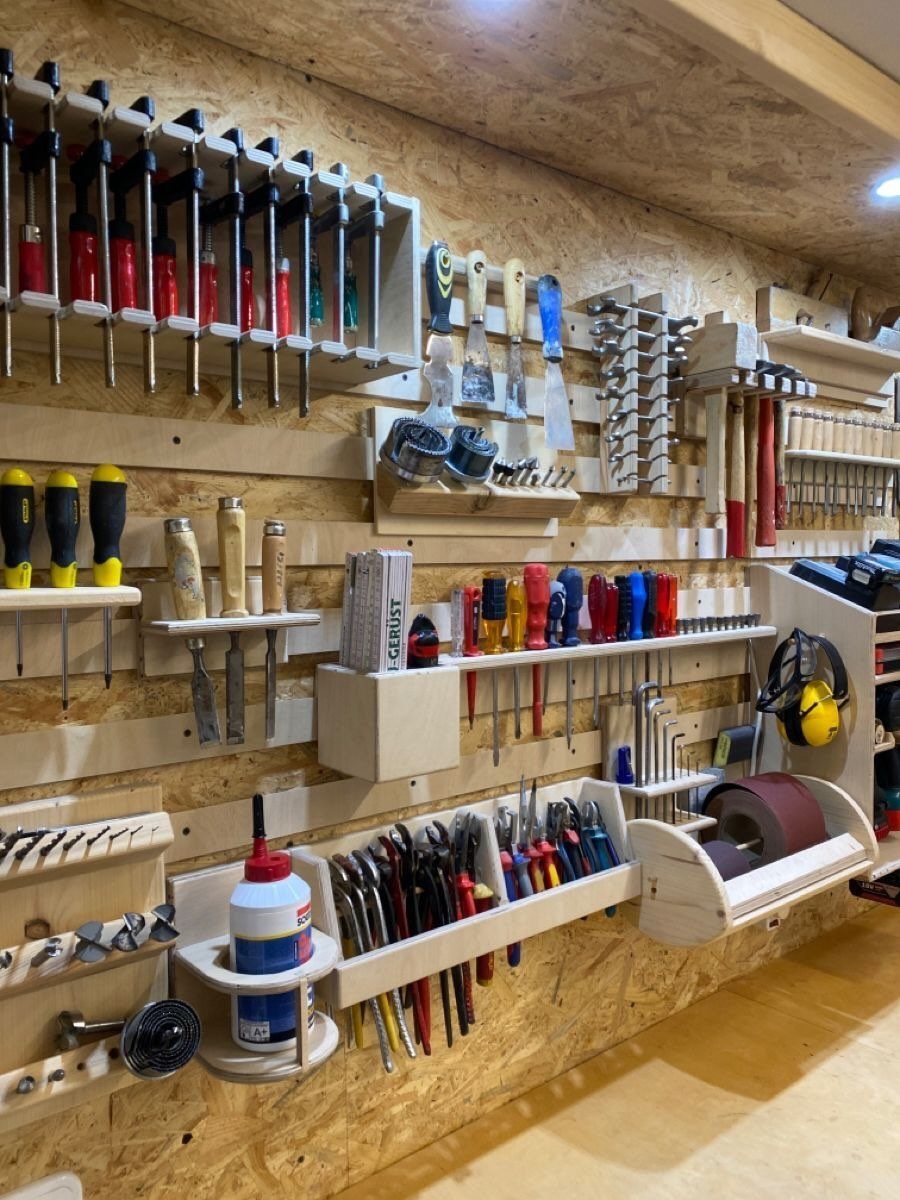
An OSB wall is already a working surface; adding custom plywood holders for each tool turns it into a system where everything has one home and no home fits anything else.
French cleats are doing the heavy holding, with slotted compartments for smaller items below.
I would start with the tools I reach for most, build holders for those five or six, and leave the rest on a shelf until the pattern proves itself.
Plywood slots for chisels and screwdrivers need a back angle so the handles rest against the wall; vertical slots let them fall forward.
12. Tall Shelving with Base Cabinet
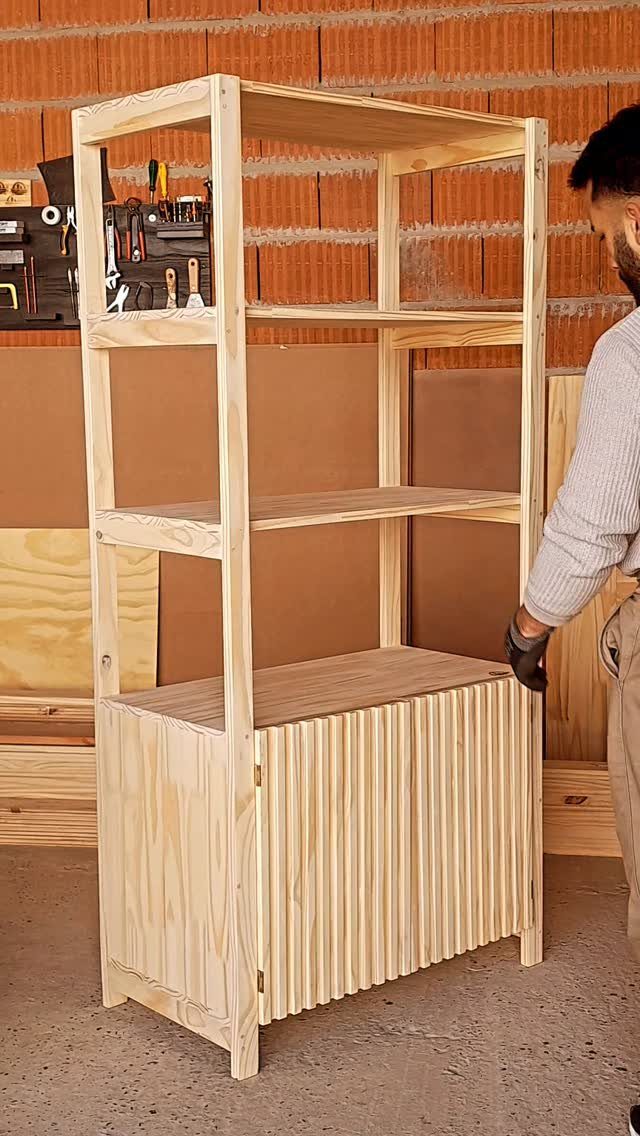
A tall unit with open shelves above and a slatted cabinet below gives you display and concealment in one piece, which suits a workshop that sometimes needs to look kept.
The fluted door detail reads as intentional, not afterthought, but I would build it plain first and add slats only if the shop stays dry; horizontal grooves collect sawdust and damp equally.
The proportions matter: the cabinet base should sit high enough off the floor, or you are kneeling for every stored item.
I would put the heavy, ugly stuff down there and keep the open shelves for current projects and boxes in active use.
13. Freestanding Slat Wood Shelving Unit
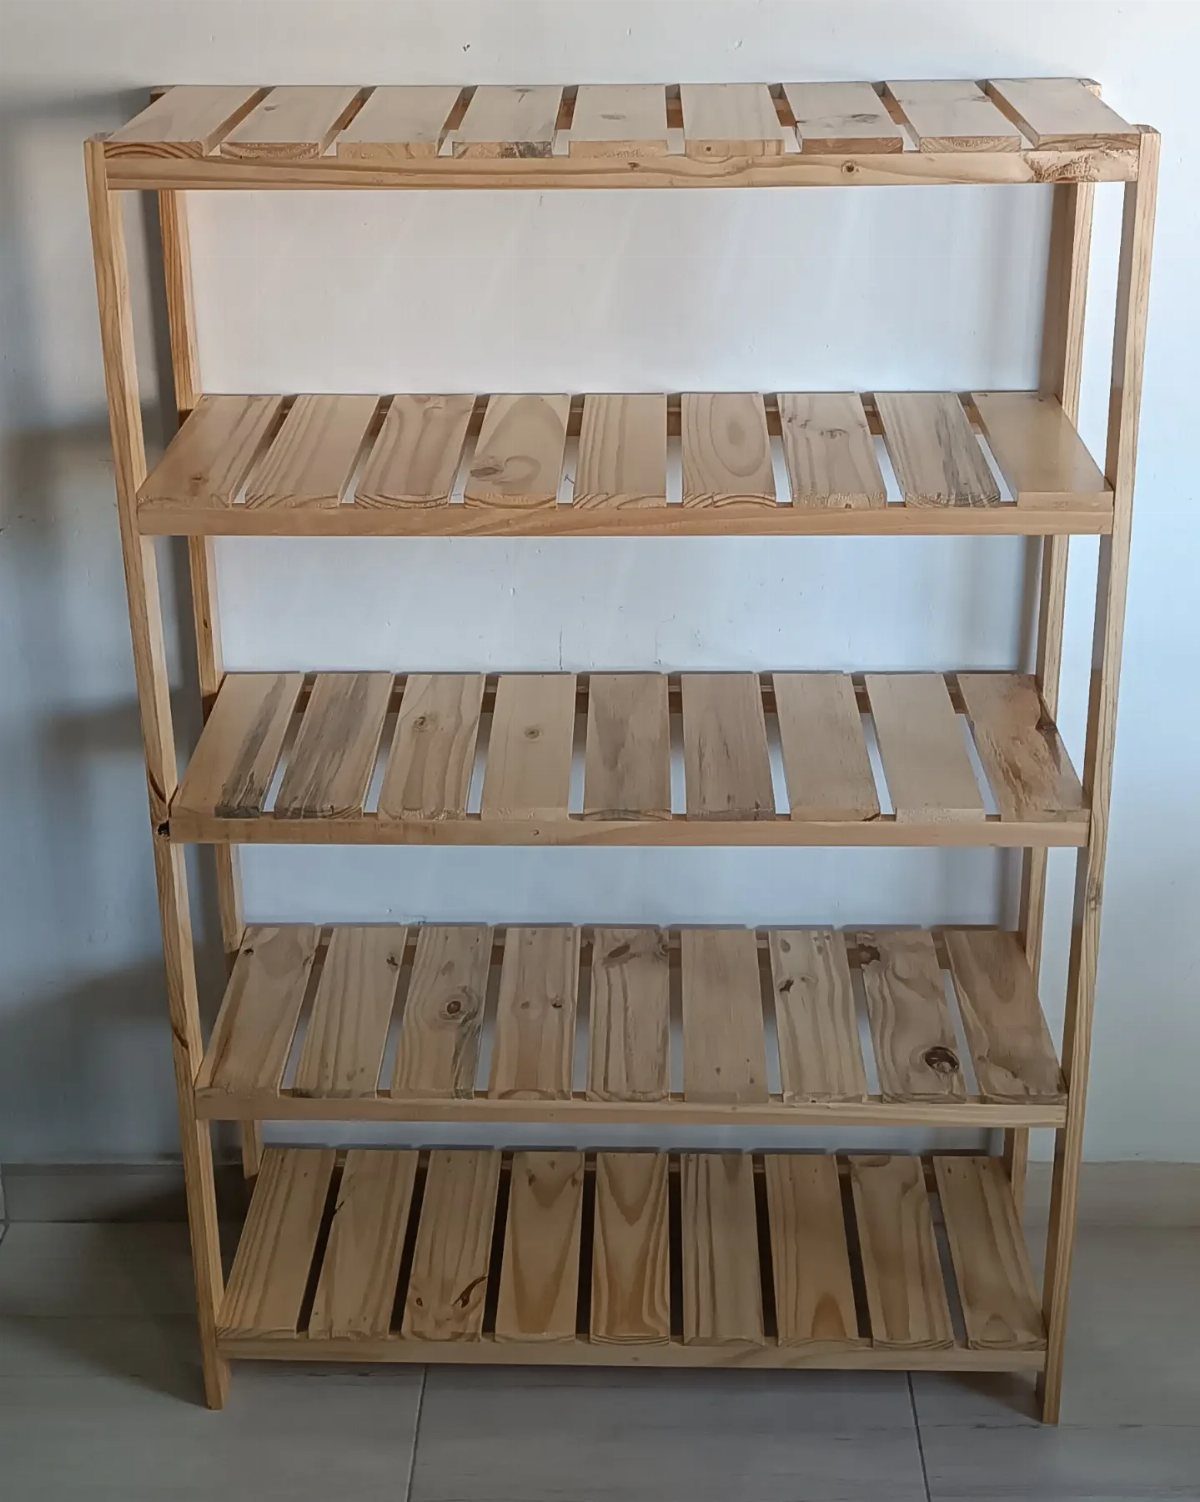
Freestanding slat wood shelving gives you storage that needs no wall at all, which matters when your shed is concrete block or metal with nowhere to drive a screw.
The open sides and back let light through and keep the unit from looking heavy even when it is full.
5 tiers at this height is a lot of vertical reach; I would put the lightest, least-used items up top and keep daily gear between my shoulders and hips.
Check the footprint against your door swing and work path before you buy or build; a freestanding unit in a tight shed becomes an obstacle fast.
14. Repurposed Wooden Crate Cubbies
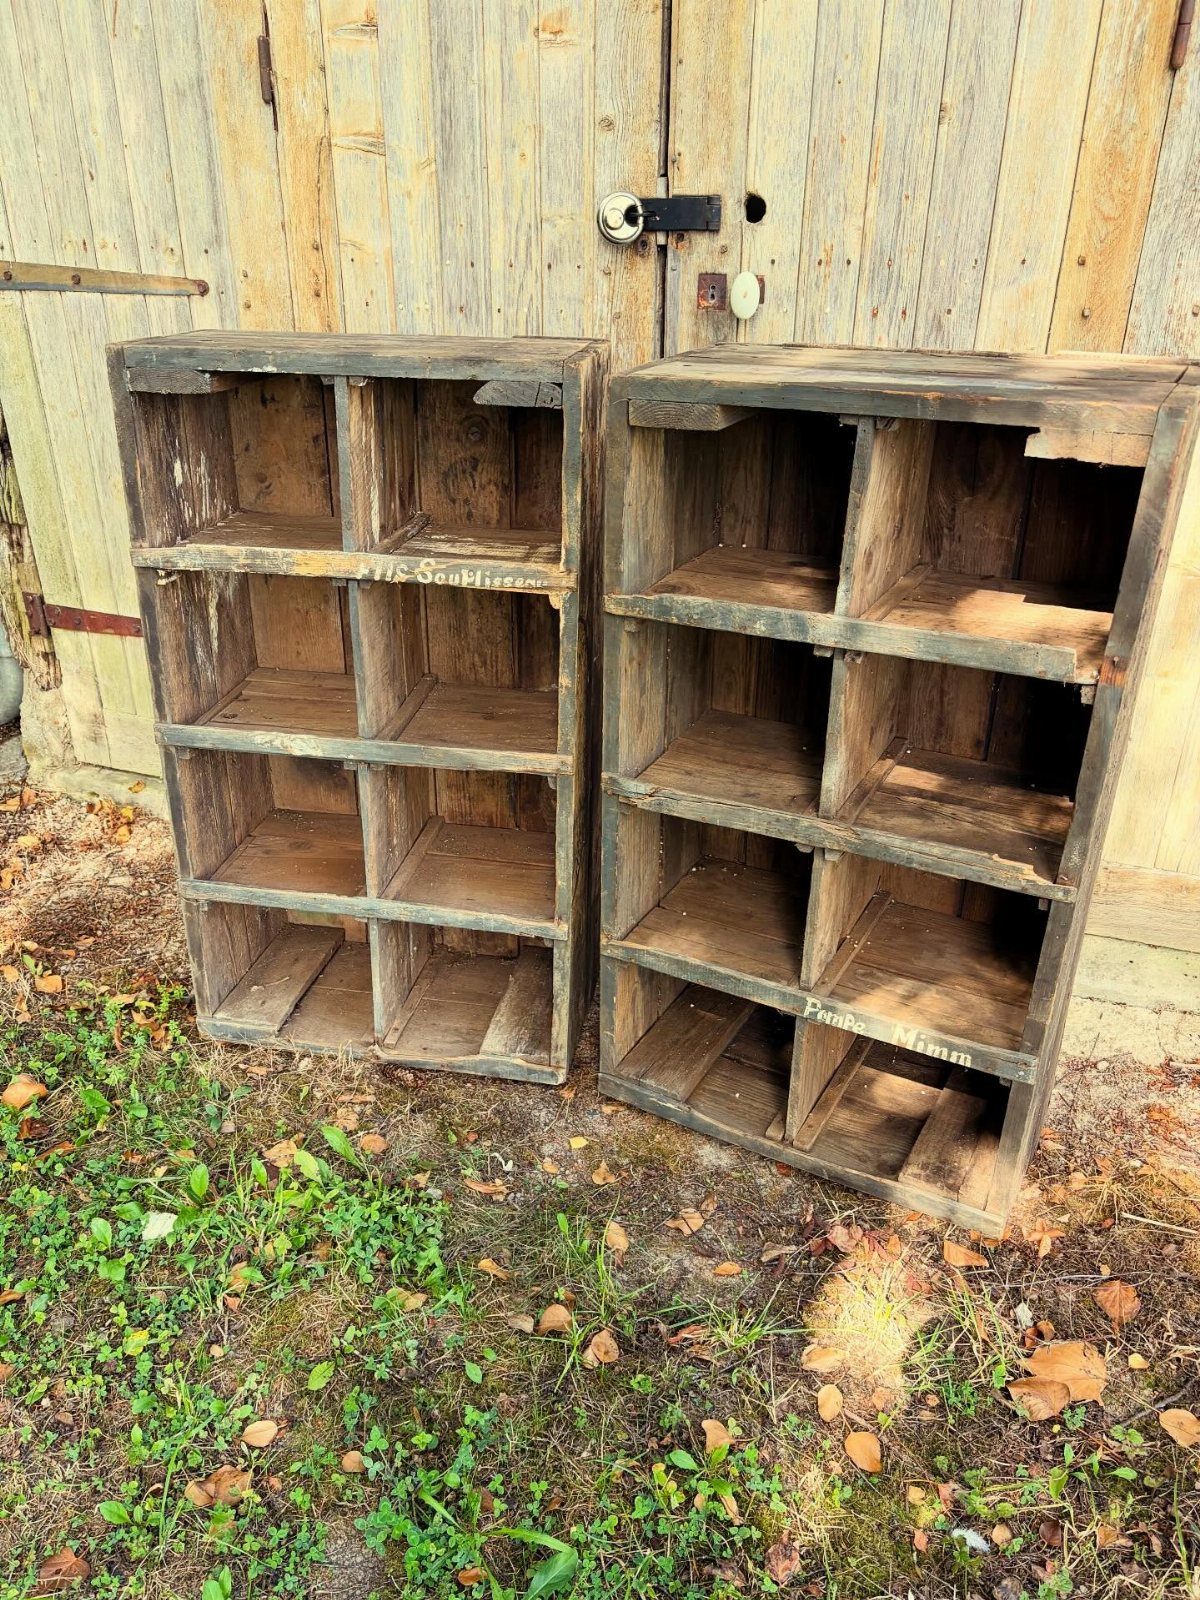
Weathered wooden crates stacked into cubby units give you compartment storage with the character already baked in, no stain or distressing required.
The eight-cube layout suits small items that would tangle on open shelves: seed packets, hardware bins, hand tools, extension cords.
These crates look like they came straight from the yard, which tells me they are either exterior-grade or already on their way to warping.
I would use reclaimed pallet wood only if I planned to keep them dry, or seal them with exterior spar varnish if they live near a shed door like this.
The cubby depth is the decision: too shallow and items fall out, too deep and the back becomes a graveyard.
Frequently Asked Questions
What can I use instead of a shelf?
Pegboard is my first choice when I want storage without building boxes. Heavy stuff still wants a shelf or a cleat behind it; peg hooks on their own will pull out once the load gets real.
What type of wood for shed shelves?
Plywood and 2x4s are what I reach for. OSB sheathing, the kind Georgia-Pacific and others sell, takes screws well enough for track-mounted adjustable shelving, though thin paneling always needs a backing board so the hardware doesn’t tear through.
For long spans, 3/4-inch plywood starts to sag past 24 inches under real weight, so I build in vertical supports at regular intervals or keep the load light.
